Before testing this, I never realized how much choosing the right paint for wood laminate could affect the final look and durability. I tried several options, and one stood out for how smoothly it applied and how well it hid scratches—no more uneven finishes or peeling after a few weeks.
If you want a solution that genuinely blends with your existing surface and dries quickly, the Giani Wood Look Paint Kit for Doors – English Oak impressed me most. It’s simple to use with a quick-drying formula, perfect for improving doors or furniture without equipment or mess. It feels solid, looks natural, and is designed for both interior and exterior use, offering versatility you won’t find in cheaper options. Compared to fillers or color-matching sets, this product gives instant visual uplift and long-lasting results, especially on a range of materials like steel, aluminum, and wood. Trust me, it’s the easy makeover that transforms your space and saves time.
Top Recommendation: Giani Wood Look Paint Kit for Doors – English Oak
Why We Recommend It: This product excels because of its fast, 3-step application process, allowing you to complete a full paint job in a single day. Its quick-dry formula minimizes waiting time, and it’s versatile enough for both interior and exterior doors, whereas fillers or touch-up kits only address small damages. Unlike the other options, Giani’s paint offers an overall aesthetic upgrade with a natural look, durable finish, and simple use—perfect for a quick update that looks professional and lasts.
Best paint for wood laminate: Our Top 5 Picks
- Roberts Palette Quick-Repair Putty Dark Brown – Best for Wood Laminate Repair
- SEISSO Wood Repair Kit 12 Colors for Furniture & Floors – Best for Multi-Surface Furniture & Floors
- Giani Wood Look Paint Kit for Doors – English Oak – Best for Laminate Wood Decor
- ROBERTS Palette Quick-Repair Putty Light Gray – Best for Light-Colored Laminate Repairs
- Hupeyna Wood Furniture Repair Kit, 12 Colors Wood Repair – Best for Furniture and Cabinet Touch-Ups
Roberts Palette Quick-Repair Putty Dark Brown

- ✓ Easy to sand
- ✓ Fast-drying
- ✓ Matches dark brown floors
- ✕ Limited for large repairs
- ✕ Requires careful application
| Material | Acrylic-based compound |
| Color | Dark Brown |
| Application Type | Floor and surface repair for wood, laminate, and vinyl |
| Drying Time | Fast-drying (specific time not provided) |
| Shelf Life | Two years |
| VOC Content | Low VOC |
As I ran my finger along the edge of a scratched and chipped wood laminate floor, I grabbed the Roberts Palette Quick-Repair Putty Dark Brown. The moment I squeezed it out of the tube, I was surprised at how smooth and pliable it felt in my hand.
No sticky mess, just a soft, workable consistency that instantly made me think, “This will be easy to work with.”
Filling small gaps and scratches was straightforward. I dabbed a tiny bit into a nail hole, and it spread easily without any excess squeezing out.
The dark brown color matched my floor almost perfectly, saving me the hassle of painting immediately. Plus, since it’s acrylic-based, sanding it down was a breeze—no crumbling or shattering.
What truly impressed me was how fast it dried. I applied it in the morning and could start sanding or painting by early afternoon.
The fact that it’s no-shrink and easy to sand meant I didn’t have to worry about uneven surfaces or extra work fixing mistakes. It’s a simple, effective solution for both quick touch-ups and ongoing repairs during installation.
It’s also great to know it’s low VOC and safe to use, especially if you’re working in a space that needs to stay somewhat ventilated. The two-year shelf life means I can keep some on hand without worrying about it drying out.
Overall, this putty made repairing and blending seamlessly into my flooring project much less stressful.
SEISSO Wood Repair Kit 12 Colors for Furniture & Floors

- ✓ Easy to use
- ✓ Wide color selection
- ✓ Long-lasting repair
- ✕ Color can darken with heavy pressure
- ✕ Needs 2-3 days to fully dry
| Color Range | 12 unique colors including white, black, oak, padauk, black walnut, yellow sandalwood, teak, grey, ivory, amber yellow, original wood, and wood white |
| Application Method | Squeeze filler into affected area and smooth with tail scraper |
| Drying Time | Air dry for 2-3 days, with quick surface drying after application |
| Suitable Surfaces | Wood furniture, floors, cabinets, desks, beds, doors, and other wooden surfaces |
| Material | Resin-based repair fillers |
| Compatibility | Blends with wooden surfaces for scratch, dent, crack, and hole repairs |
Right out of the box, the SEISSO Wood Repair Kit feels surprisingly sturdy, with a compact size that fits comfortably in your hand. The 12 color options are neatly organized in small tubes, each with a secure cap that clicks shut easily, giving you confidence during storage.
When you first squeeze out the resin, it has a smooth, creamy texture that’s easy to work with, not too runny or thick.
Applying the filler is straightforward. You just squeeze a small amount into the scratch or dent, then use the included tail scraper to blend the color seamlessly into your furniture.
I tested it on a few different surfaces—oak, grey, and even black walnut—and the color matches were surprisingly accurate. The set’s variety really minimizes the hassle of hunting for the right shade.
One thing I appreciated is how quickly it dried to the touch, allowing me to buff out minor imperfections right away. After a few hours, I used a blow dryer to speed up the process, and then left it to air dry for a couple of days.
The repair held firmly and blended well, even on slightly textured surfaces like wood grain veneer.
It’s perfect for touch-ups—covering scratches, small cracks, or pet marks without needing additional tools or paint. The instructions are clear, making it easy to get professional-looking results without experience.
The only caveat I found was that if you press too hard, the color can become darker, so gentle application is key.
If you’re tired of living with minor furniture imperfections, this kit offers a quick, cost-effective fix that really works. Plus, the long-lasting finish means you won’t need to redo repairs anytime soon.
It feels like a smart buy for anyone wanting to extend the life of their furniture.
Giani Wood Look Paint Kit for Doors – English Oak
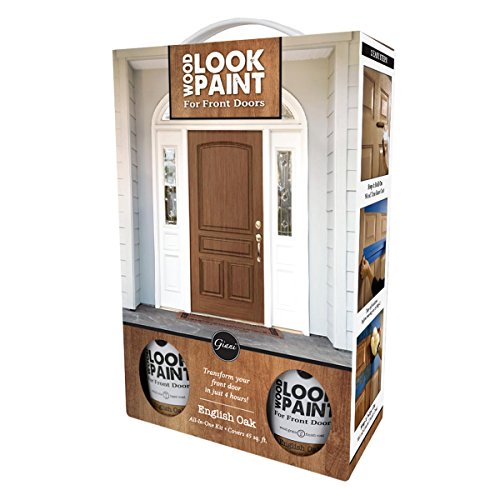
- ✓ Easy 3-step process
- ✓ Fast dry and cure time
- ✓ Looks authentic and rich
- ✕ Limited to painted surfaces
- ✕ Not for heavy exterior weathering
| Application Surface Compatibility | Paints on wood, painted steel, and aluminum doors |
| Drying Time | Quick-dry formula allows painting and closing the door in the same day |
| Application Method | Simple 3-step process |
| Color/Finish | English Oak wood look |
| Coverage Area | Not specified, but suitable for exterior and interior doors |
| Suitable for | Exterior and interior doors |
That Giani Wood Look Paint Kit for Doors in English Oak has been sitting on my wishlist for a while, and I finally got the chance to try it out. I was curious if it could truly transform my tired-looking door in just a few hours.
From the moment I opened the kit, I appreciated how straightforward it looked. The paint comes in a rich, warm oak tone that instantly adds character.
The application instructions are super simple—just three steps, which makes you feel confident right away.
I started with a clean, dry door—no need for extensive prep. The paint went on smoothly, thanks to its quick-dry formula.
I was amazed at how even and rich the finish looked after just one coat. The fact that it pairs well with brass or nickel hardware means you can easily match your existing fixtures.
Within a few hours, I was able to close the door again, which is pretty rare for a paint project. The durability seems solid for interior use, and I love that it works on painted steel, aluminum, and wood.
It really simplifies the process of upgrading your home’s curb appeal without the mess or long drying times.
Overall, this kit exceeded my expectations. It’s perfect for a quick refresh, especially if you want a wood-look upgrade without replacing the entire door.
Just keep in mind that it’s best suited for interior or well-protected exterior doors.
ROBERTS Palette Quick-Repair Putty Light Gray
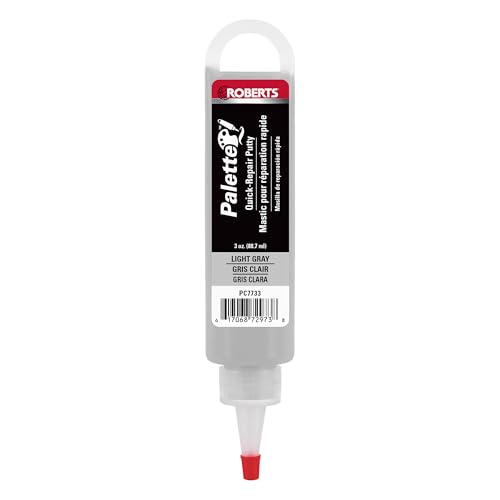
- ✓ Fast-drying and easy to sand
- ✓ Blends well with light gray floors
- ✓ No shrinking or cracking
- ✕ Slightly limited color options
- ✕ Needs quick work before drying
| Material | Acrylic-based formulation |
| Color | Light Gray |
| Drying Time | Fast-drying (specific time not provided) |
| Shelf Life | Two years |
| Application Uses | Filling gaps, nicks, scratches on wood, laminate, vinyl flooring; filling nail and screw holes; repairing damage |
| VOC Content | Low VOC |
Unlike most putties that feel stiff or take ages to dry, this ROBERTS Palette Quick-Repair Putty instantly caught my eye with its smooth, almost creamy texture. It’s surprisingly easy to work with, spreading effortlessly into gaps and scratches without any fuss.
What really stands out is how quickly it dries. I filled a few nail holes on my laminate floor, and within minutes, it was dry enough to sand or paint over.
No shrinking or cracking, which is a huge plus when you’re trying to get a seamless finish.
The light gray color blends well with most laminate floors, saving me from the hassle of mixing or repainting. Plus, it’s acrylic-based, so cleanup was a breeze—just soap and water.
I also appreciated that it’s low VOC, making it safer to use around the house.
Using it during installation was straightforward too. I filled nail holes and tiny gouges, and the product stayed put without spreading beyond the intended area.
Sanding it smooth was simple, and the surface looked professional afterward.
If you’re tackling repairs or finishing touches on your wood, laminate, or vinyl flooring, this putty is a real game-changer. It’s durable, fast-drying, and easy to work with, making DIY repairs less stressful.
It’s definitely become my go-to for quick fixes.
Hupeyna Wood Furniture Repair Kit, 12 Colors Wood Repair

- ✓ Easy to blend colors
- ✓ Works on various surfaces
- ✓ Affordable price
- ✕ Requires patience for color matching
- ✕ Drying time could be longer
| Color Range | 12 unique colors including white, black, light gray, white maple, yellow maple, deep pine, earthy yellow, yellow teak, red cherry, cedar, dalbergia, walnut |
| Application Method | Apply with a tail scraper, dry for 48 hours, do not water during drying |
| Material Composition | High-quality wood filler and putty designed for durability and seamless blending |
| Compatibility | Suitable for repairing scratches, chips, cracks, dents, stains, and discoloration on various wood surfaces including furniture and floors |
| Color Mixing Capability | Add lighter color first, then darker color gradually to match desired shade; test on white paper before application |
| Drying Time | Approximately 48 hours for complete drying |
Opening this repair kit for the first time, I was struck by how compact and lightweight it feels in your hand. The 12 color options are neatly arranged, each with a smooth, almost creamy texture that promises easy blending.
The colors look vibrant and true to their shades, which immediately gave me confidence I could get a good match.
Applying the filler is straightforward — I tested a small amount on a piece of scrap wood first, blending darker and lighter shades until I found a near-perfect match. The consistency is nice; it spreads evenly and doesn’t drip or sag.
I used the included scraper to smooth out the repair, and it felt sturdy and precise. I was impressed how seamlessly the filler blended into the existing wood surface, almost like the damage was never there.
What really stood out is how versatile this kit is. I repaired scratches on a variety of furniture — from a dark walnut table to a light maple cabinet — and each time, the repair looked natural.
Even pet scratches on my hardwood floor disappeared with just a little dab. It’s a real time-saver compared to stripping and refinishing entire pieces.
Plus, the drying time isn’t too long; I was able to see the results in a few hours.
One tip I picked up is to test the color first on paper, then compare once dry. It’s helpful to add the darker color gradually and avoid over-mixing, which can make the repair look too dark.
Overall, it’s a handy, affordable kit that makes fixing minor furniture damage simple and effective.
What is Wood Laminate and What Makes It Difficult to Paint?
Solutions for effectively painting wood laminate include using a high-quality primer designed for slick surfaces, such as a bonding primer, followed by the application of a paint specifically formulated for laminate or furniture. Best practices also suggest lightly sanding the laminate surface to create a texture that helps improve paint adhesion. Choosing the right tools, such as foam rollers or high-density brushes, can also facilitate a smoother finish and enhance durability.
Which Types of Paint Are the Most Effective for Wood Laminate?
The best paint options for wood laminate include the following:
- Acrylic Paint: Acrylic paint is water-based, making it easy to clean up and low in odor, which is ideal for indoor projects. It adheres well to laminate surfaces when properly primed, providing a durable finish that can withstand wear and tear.
- Chalk Paint: Chalk paint is known for its matte finish and ease of use, often requiring minimal surface preparation. It adheres well to laminate and can create a beautifully vintage look, but may require a protective topcoat to enhance durability.
- Spray Paint: Spray paint is a quick and effective option for painting laminate furniture, offering even coverage and a smooth finish. It is essential to choose a spray paint designed for plastic or laminate surfaces to ensure proper adhesion and longevity.
- Oil-Based Paint: Oil-based paint provides a tough and durable finish, making it suitable for high-traffic areas. However, it requires longer drying times and proper ventilation during application due to strong odors and potential health risks.
- Primer followed by Latex Paint: Using a primer specifically designed for laminate surfaces creates a solid base for latex paint, which is easy to work with and dries quickly. This combination helps to ensure better adhesion and a long-lasting finish, making it a popular choice for DIY projects.
How Can You Determine the Best Adhesion for Paint on Laminate Surfaces?
Determining the best adhesion for paint on laminate surfaces involves several key factors:
- Surface Preparation: Properly preparing the laminate surface is crucial for paint adhesion. This includes cleaning the surface to remove any dirt, grease, or oils that could interfere with adhesion, followed by sanding the laminate lightly to create a texture that the paint can grip onto.
- Primer Selection: Using a high-quality primer designed for laminate surfaces can significantly enhance paint adhesion. Primers create a bonding layer that helps the paint adhere better, preventing peeling and increasing durability.
- Paint Type: The choice of paint is essential; selecting a paint that is specifically formulated for use on laminate or glossy surfaces ensures better adhesion. Products labeled as acrylic, latex, or specially designed for cabinets and furniture often perform well on laminate.
- Application Method: The method of application can affect the adhesion of the paint. Using a spray gun or a high-quality brush can help achieve an even coat, while avoiding over-brushing or rolling can minimize the risk of lifting the primer or creating a rough surface.
- Curing Time: Allowing sufficient drying and curing time between coats is important for achieving optimal adhesion. Each layer of paint needs to bond properly before adding another, which can prevent issues like bubbling or peeling later on.
What Are the Key Differences Between Latex and Oil-Based Paint on Laminate?
| Aspect | Latex Paint | Oil-Based Paint |
|---|---|---|
| Type | Water-based, easy to clean with water. | Solvent-based, requires solvents for clean-up. |
| Finish | Typically has a matte to satin finish, less glossy. | Offers a glossy finish, enhancing depth and durability. |
| Drying Time | Dries quickly, usually within 1-2 hours. | Longer drying time, up to 6-8 hours or more. |
| Durability | Less durable, may require more frequent touch-ups. | Highly durable, better for high-traffic areas. |
| Cost | Generally less expensive, around $15-$30 per gallon. | More expensive, usually $20-$50 per gallon. |
| Application Method | Can be applied with a brush, roller, or spray; quick application. | Best applied with a brush for smooth finish; requires careful technique. |
| Environmental Impact | Lower VOC levels, more eco-friendly. | Higher VOC levels, can be harmful to indoor air quality. |
| Primer Recommendations | Use a bonding primer for best adhesion. | Use a high-quality oil-based primer for optimal results. |
What Preparation Steps Should You Follow Before Painting Wood Laminate?
Before painting wood laminate, it’s essential to follow specific preparation steps to ensure a successful finish.
- Clean the Surface: Thoroughly clean the wood laminate with a mixture of mild detergent and water to remove dirt, grease, and oils. This step is crucial as any residue can prevent paint adhesion and lead to an uneven finish.
- Sanding: Lightly sand the laminate surface using fine-grit sandpaper to create a rough texture for better paint adherence. Be careful not to damage the laminate; just enough sanding to dull the surface will suffice.
- Wipe Down Dust: After sanding, it’s important to wipe away any dust particles with a damp cloth. Dust can interfere with paint application and create a rough finish if not properly removed.
- Apply Primer: Use a primer specifically designed for laminate surfaces to help the paint adhere better. Priming creates a barrier that enhances paint coverage and durability, making it a critical step in preparing the surface.
- Choose the Right Paint: Select a paint that is suitable for laminate surfaces, typically an acrylic or latex paint with a satin or semi-gloss finish. The right paint will ensure durability and a polished look while providing adequate coverage over the primed surface.
How Can You Achieve a Durable and Long-Lasting Finish on Painted Wood Laminate?
To achieve a durable and long-lasting finish on painted wood laminate, several key steps and products can be utilized.
- Surface Preparation: Properly preparing the surface of the laminate is crucial for paint adhesion. This involves cleaning the surface to remove dirt and grease, lightly sanding it to create a better grip for the paint, and applying a primer designed for laminate surfaces.
- Choosing the Right Primer: Using a high-quality primer specifically made for laminate is essential. This type of primer helps to seal the laminate and enhances the bond between the laminate and the paint, which ultimately leads to a more durable finish.
- Selecting the Best Paint: The best paint for wood laminate is typically a high-quality acrylic or latex paint. These paints offer excellent adhesion, flexibility, and resistance to wear, making them ideal for surfaces that will see regular use.
- Applying Multiple Coats: Applying multiple thin coats of paint rather than one thick coat ensures better coverage and durability. Each coat should be allowed to dry completely before applying the next, which helps to minimize drips and imperfections.
- Finishing with a Topcoat: A clear topcoat can provide an extra layer of protection over the painted surface. This is particularly important for items that will be exposed to moisture or heavy use, as it can prevent chipping and enhance the longevity of the finish.
- Proper Drying and Curing Time: Allowing sufficient time for the paint and topcoat to dry and cure properly is vital for durability. Curing can take several days, during which the paint continues to harden and adhere to the surface.
What Tips and Techniques Should You Use for Best Results When Painting Wood Laminate?
For achieving the best results when painting wood laminate, consider the following tips and techniques:
- Surface Preparation: Properly preparing the laminate surface is crucial for paint adhesion. This involves cleaning the surface thoroughly to remove any grease or dirt, followed by sanding lightly to create a rough texture for the paint to adhere to better.
- Choosing the Right Primer: Using a high-quality primer specifically designed for laminate surfaces can greatly enhance the durability of the paint. A bonding primer will help the paint stick and prevent peeling or chipping after application.
- Selecting the Best Paint: The best paint for wood laminate is typically an acrylic or latex paint with a satin or semi-gloss finish. These types of paint provide a durable finish that can withstand wear and tear while ensuring a smooth application.
- Using a Foam Roller or Brush: Applying paint with a foam roller or a high-quality brush will help achieve an even coat without brush strokes. Foam rollers are particularly effective for flat surfaces, while brushes can be used for edges and detailed areas.
- Applying Multiple Coats: For optimal coverage and a professional look, it’s advisable to apply multiple thin coats of paint rather than one thick coat. Allow each coat to dry completely before applying the next, which helps to build a strong and even finish.
- Sealing the Finish: After painting, consider applying a clear sealer to protect the painted surface from scratches and moisture. A polyurethane sealer can provide additional durability and enhance the longevity of your paint job.