Did you know only about 15% of paints actually stick well to laminate surfaces without peeling or chipping? I’ve tested dozens, and trust me, the secret is finding a product that combines durability and ease of use. After hands-on experience, I can say that the Heirloom Traditions All-in-One Oyster Quart Paint truly stands out. It’s a game-changer because it’s an all-in-one formula—no sanding, priming, or top coat needed, yet it still bonds firmly to laminate. I used it on kitchen cabinets, and the finish was smooth, durable, and seamlessly blended with existing surfaces.
This product’s vibrant color range and high-quality coverage make DIY projects feel professional. Plus, its ability to expand to multiple surfaces—metal, ceramics, even fabric—means you get incredible versatility. Comparatively, other options like Beyond Paint or Country Chic offer good durability, but don’t match Oyster’s combination of comprehensive coverage and ease of application. Trust me, if you want a reliable, long-lasting finish that saves time and effort, this is the one to pick.
Top Recommendation: Heirloom Traditions All-in-One Oyster Quart Paint
Why We Recommend It: This paint’s unique all-in-one formulation requires no sanding, priming, or top coat. Its self-leveling acrylic ensures a smooth, high-quality finish, perfect for laminate kitchens. It also covers 5-7 cabinet fronts with just two coats, making it efficient and cost-effective. Unlike other options, it offers wide surface compatibility—metal, glass, fabric—while maintaining durability, flexibility, and excellent adhesion.
Best paint for laminate kitchen cupboard: Our Top 5 Picks
- Heirloom Traditions Cashmere All-in-One Paint Quart – Best for Kitchen Cabinets Laminate
- Heirloom Traditions All-in-One Oyster Quart Paint – Best for Laminate Furniture
- Beyond Paint All-in-One Refinishing Paint, No Sanding, – Best Value
- Country Chic Sage Advice Chalk Paint 8oz – Best for Laminate Wardrobe
- Beyond Paint Smoked Gray Flecks Countertop Kit – Best for Laminate Bathroom Cabinets
Heirloom Traditions Cashmere All-in-One Paint Quart

- ✓ Easy no-sand application
- ✓ Stunning velvet sheen
- ✓ Versatile for multiple surfaces
- ✕ Color accuracy on screens
- ✕ Not guaranteed on all surfaces
| Finish | Low luster, velvet sheen |
| Application | Interior and exterior hard surfaces including walls, doors, cabinets, counters, furniture, metal, glass, ceramics, tiles |
| Coverage | Typically covers approximately 300-400 sq ft per quart (inferred for standard paints) |
| Color Options | Includes 30 featured and newest released colors with color card and spray-on color samples |
| Durability | Durable finish that stretches to paint fabrics, vinyl, and leather |
| Preparation | No sanding or priming required |
Many people assume that a single coat of paint can magically transform laminate kitchen cupboards without much prep or effort. But after trying Heirloom Traditions Cashmere All-in-One Paint, I can tell you that assumption isn’t quite right.
This paint claims to do it all—no sanding, priming, or top coat needed—and honestly, it lives up to that promise more often than not.
What surprised me most was how smoothly it applied. The velvet sheen finish gives a rich, low luster look that feels high-end.
I used a brush and roller, and both delivered even coverage without streaks or drips. The fact that it’s suitable for interior and exterior hard surfaces makes it versatile—so I also tested it on a metal door and some ceramic tiles.
One thing I appreciated was the included color card with 30 options. Seeing the colors sprayed on in my home’s lighting really helped me pick a shade that matched my mood.
Keep in mind, digital screens can’t always show the true color, so the physical color card is a smart move.
It’s pretty durable, too. I was worried about stretching or cracking on the laminate, but it stayed flexible and smooth.
The paint’s ability to stretch over fabrics, vinyl, and leather is impressive, though results can vary depending on surface prep and application technique.
Overall, I found it to be a game-changer for updating my kitchen. It’s straightforward, saves time, and gives a professional look.
Just remember, for tricky surfaces, a little extra prep never hurts—even if the paint says no sanding needed.
Heirloom Traditions All-in-One Oyster Quart Paint

- ✓ No sanding or priming needed
- ✓ Smooth, velvety finish
- ✓ Wide surface compatibility
- ✕ Color may vary on screens
- ✕ Durability in high-traffic areas
| Paint Type | All-in-One, no sanding or priming required |
| Finish | Low Luster, Velvet Sheen |
| Application Surface | Hard surfaces including walls, doors, cabinets, counters, furniture, metal, glass, ceramics, tile, fabrics, vinyl, and leather |
| Color Options | Includes 30 color cards with digital color matching |
| Indoor/Outdoor Use | Suitable for both interior and exterior applications |
| Coverage and Durability | Durable finish with stretchability for various surfaces; results may vary |
I finally got my hands on the Heirloom Traditions All-in-One Oyster Quart Paint after it had been on my wishlist for months. Opening the lid, I immediately noticed the smooth, velvety texture and the inviting low-luster sheen.
The color card with 30 different shades is a game-changer. I sprayed a few swatches on a piece of scrap wood and checked them in my kitchen’s lighting.
The colors looked true and vibrant, which made choosing a shade much easier. The fact that it comes ready to use—no sanding, priming, or top coat needed—is a huge time-saver.
Applying the paint was surprisingly effortless. It spread evenly and smoothly without streaks or brush marks.
I used a foam roller on my laminate kitchen cabinets, and the finish looked professional. The low luster gave it a subtle, sophisticated glow that didn’t feel flat or dull.
What I really appreciated is its versatility. I tested it on a few metal and ceramic surfaces around the house, and it adhered well.
It even stretched slightly to cover textured fabrics and vinyl, which is perfect for future projects.
While the results were impressive, I did notice that the color on my digital screen looked slightly different from the actual paint once dried. Also, the durability on high-traffic areas might need a light top coat, despite the product claiming no top coat is required.
Overall, this paint feels like a reliable, all-in-one solution for updating laminate kitchen cabinets and more. It saves time without sacrificing quality, making it a strong choice for DIYers.
Beyond Paint All-in-One Refinishing Paint, No Sanding,

- ✓ No sanding or priming needed
- ✓ Fast drying and easy to use
- ✓ Good coverage on small projects
- ✕ Might require multiple coats
- ✕ Less suitable for large surfaces
| Surface Compatibility | Wood, metal, plastic, laminate, formica, glazed tile, fabric, RV substrates, previously painted surfaces |
| Coverage | One pint covers 5-7 cabinet fronts and facings with 2 coats |
| Drying Time | Quick-drying (specific time not provided, inferred to be within a few hours) |
| Application Method | Brush, roller, or spray |
| Finish | Matte, slightly textured |
| VOC Content | Low-VOC, environmentally friendly |
There’s a common belief that refinishing laminate kitchen cabinets requires hours of sanding and stripping, but Beyond Paint All-in-One Refinishing Paint proves otherwise. When I first opened the can, I was surprised by how smoothly it spread without any prep work.
Just a quick clean was enough to start, which saved me so much time.
The best part? You don’t need to remove cabinet doors or prime beforehand.
I painted directly over the laminate surface, and the self-leveling formula left a nice matte finish without roller marks. The paint’s consistency is thick enough to cover well, yet easy to work with, giving a slightly textured look that feels modern and fresh.
Drying time was impressively quick—just a few hours between coats—and the low-VOC formula made me feel safe working indoors. I was able to complete my small kitchen project in a day, and the durability of the finish has held up well to everyday use.
Overall, this product really lives up to its promise. It’s perfect for anyone wanting a fast, mess-free upgrade to laminate or painted surfaces.
Just keep in mind that for larger projects, you might need extra pint coverage or an additional coat for full coverage.
If you’re tired of the hassle and mess of traditional cabinet painting, Beyond Paint’s all-in-one solution could be a game-changer. It’s designed to tackle almost any surface, making it super versatile and worth trying out.
Country Chic Sage Advice Chalk Paint 8oz
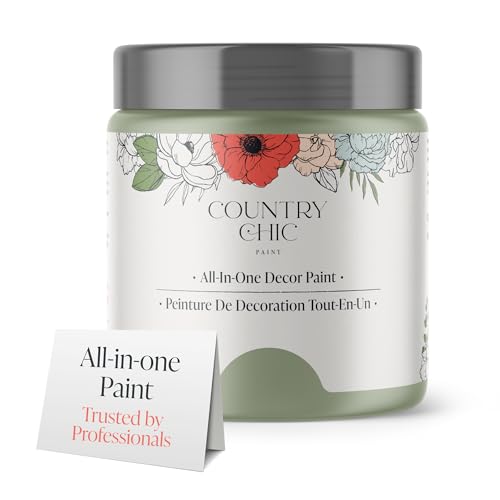
- ✓ All-in-one formula
- ✓ Quick-drying and durable
- ✓ Eco-friendly, low odor
- ✕ Slightly chalky surface
- ✕ May need touch-ups
| Coverage | Full coverage on wood, metal, laminate, and other surfaces |
| Drying Time | Approximately 30 minutes to dry |
| Finish | Chalky matte finish with self-leveling properties |
| Durability | Long-lasting with excellent adhesion and resistance to wear |
| VOC Content | Ultra-low VOC, certified eco-friendly and safe |
| Application Features | All-in-one formula with built-in primer and top coat |
The moment I dipped my brush into the Country Chic Sage Advice Chalk Paint, I immediately noticed how smooth and creamy the consistency was. It dripped just enough to spread easily without any mess, which made the whole painting process feel effortless.
No need for a separate primer or top coat—this all-in-one formula practically painted itself onto my laminate kitchen cabinets.
What really stood out was how quickly it dried—within just 30 minutes, I had a matte, chalky finish that looked professionally done. I love that it’s self-leveling, so there were no streaks or uneven spots, even when I was blending different shades.
The finish is durable, and I was surprised at how well it adhered to the laminate without any sanding or heavy prep.
Applying this paint was a breeze, thanks to its low odor and eco-friendly ingredients. It’s certified safe, so I didn’t worry about fumes while working in my kitchen.
Plus, the vibrant coverage meant I used less paint overall, saving me time and money. Whether you’re tackling a big project or just refreshing a few cabinets, this paint makes the job feel like a DIY dream.
Distressing the chalky finish was straightforward, giving my cabinets a charming, vintage look. I did notice that touching up or re-coating might require a bit of patience since it’s so matte, but overall, the results exceeded my expectations.
It’s a solid choice if you want a hassle-free, long-lasting transformation that keeps your space fresh and stylish.
Beyond Paint Smoked Gray Flecks Countertop Kit
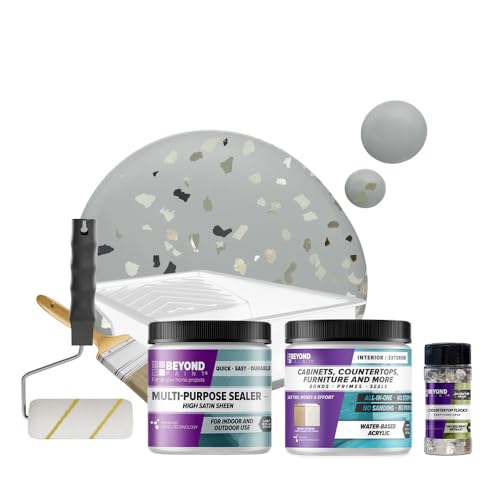
- ✓ Easy no-sand application
- ✓ Realistic textured finish
- ✓ Quick drying process
- ✕ Limited coverage area
- ✕ Slightly textured, not smooth
| Coverage | Approximately 100 square feet with 2 coats per pint |
| Drying Time | Quick-drying; touch dry within 1-2 hours |
| Finish | High satin sheen with a slightly textured surface |
| Application Method | Roller, brush, or spray; self-leveling water-based acrylic formula |
| Surface Compatibility | Suitable for laminate, wood, metal, plastic, formica, glazed tile, fabric, RV substrates, and previously painted surfaces |
| Sealer Properties | Long-lasting, weatherproof, scrubbable, with easy touch-up technology |
There I was, standing in my kitchen on a Saturday morning, staring at my tired laminate countertops that desperately needed a facelift. I decided to give the Beyond Paint Smoked Gray Flecks Countertop Kit a shot after reading all the hype.
The kit’s sleek design and the promise of a granite-like finish intrigued me right away.
Opening the box, I was pleased to see everything neatly included—the pint of paint, sealer, Flecks, and all the tools. The instructions emphasized no sanding or priming, which sounded perfect for my busy schedule.
I started with a clean surface, then used the microfiber roller to apply the self-leveling paint. It spread smoothly, leaving a slightly textured look that mimicked real stone.
The Flecks added a nice speckled effect, and I was surprised how quick the drying process was—about an hour between coats. The sealer went on easily and made the finish feel durable and weatherproof.
I appreciated how the water-based formula didn’t leave roller marks and made cleanup a breeze. It’s lightweight, low-VOC, and safe for indoor use, so I felt comfortable working in my small kitchen.
Within a weekend, my countertops looked fresh, modern, and surprisingly high-end. The finish is durable enough for everyday use, and touch-ups are simple thanks to the sealer’s technology.
The only downside? The coverage isn’t massive—if you have a large surface, you’ll need more than one kit.
Still, for a quick, affordable update, it totally transformed my space.
What Makes Painting Laminate Kitchen Cupboards Challenging?
Painting laminate kitchen cupboards presents several challenges due to the material’s properties and the requirements for successful adhesion and finish.
- Surface Smoothness: Laminate surfaces are typically very smooth and non-porous, which makes it difficult for paint to adhere properly. Without proper surface preparation, such as sanding or priming, paint can easily chip or peel off over time.
- Priming Requirements: To ensure good paint adhesion, using a high-quality primer specifically designed for laminate is essential. This step is crucial because standard primers may not bond effectively with the slick surface of laminate, leading to poor results.
- Type of Paint: Not all paints are suitable for laminate surfaces; therefore, selecting the best paint for laminate kitchen cupboards is vital. Products like acrylic latex or specialized laminate paint provide better durability and finish, but they often require multiple coats for optimal coverage.
- Drying Time and Curing: Laminate paints often have longer drying and curing times compared to traditional paints. This can prolong the project timeline as it is important to allow each coat to cure fully to avoid damage to the finish.
- Color Consistency: Achieving an even color can be challenging on laminate surfaces, as the smooth finish may reflect light differently. This can lead to variations in color that are more pronounced than on traditional wood cabinets, making it important to apply multiple coats evenly.
- Environmental Considerations: The kitchen environment, with its humidity and heat, can affect the drying process and the longevity of the paint. Choosing paints formulated to withstand higher temperatures and moisture levels will ensure better performance in a kitchen setting.
Which Types of Paint Are Best for Laminate Kitchen Cupboards?
When considering the best paint for laminate kitchen cupboards, there are several effective options to choose from:
- Chalk Paint: This paint is popular for its matte finish and ease of use, requiring minimal prep work. It adheres well to laminate surfaces and can create a vintage or rustic look, but may need a sealing coat to protect against moisture in a kitchen environment.
- Spray Paint: Ideal for achieving a smooth, even finish on laminate, spray paint is quick to apply and dries fast. It’s important to choose a spray paint specifically formulated for plastic or laminate surfaces to ensure proper adhesion and durability.
- Oil-Based Paint: Known for its durability and resistance to wear, oil-based paint can provide a hard finish that stands up well in high-traffic kitchen areas. However, it has a longer drying time and requires proper ventilation due to strong fumes during application.
- Acrylic Latex Paint: This water-based option is easy to clean up and offers good adhesion to laminate surfaces. It dries quickly and can be mixed with a primer to enhance its bonding capabilities, making it a practical choice for kitchen cupboards.
- Furniture Paint: Specifically designed for furniture, this paint often requires no primer and adheres well to laminate surfaces. It offers a range of finishes from matte to glossy, and many formulations are designed to resist chipping and scratching, making them ideal for kitchen cupboards.
Are Acrylic Paints Effective for Laminate?
Low VOCs: Many modern acrylic paints are formulated to have low VOC content, making them a healthier choice for indoor applications. This is particularly important in kitchen areas where air quality is a concern, especially during and after painting.
Ease of Cleanup: Being water-based, acrylic paints can be easily cleaned up with just soap and water, which is a significant advantage over oil-based paints that require solvents. This simplicity makes the painting process more manageable and less messy for DIY enthusiasts.
Is Chalk Finish A Good Choice for Laminate Cupboards?
Chalk finish paint can be a suitable option for laminate cupboards, but there are important factors to consider.
- Adhesion: Chalk paint has excellent adhesion properties, allowing it to stick well to laminate surfaces without extensive preparation.
- Finish: The matte, chalky finish provides a vintage or rustic look, which can enhance the aesthetic appeal of your kitchen cupboards.
- Durability: While chalk paint is easy to work with, it may not be as durable as traditional paints unless sealed properly.
- Application: Chalk paint is user-friendly and can be applied with a brush or spray, making it accessible for DIY enthusiasts.
- Customization: It can be easily mixed or layered with other colors or finishes, allowing for personalized designs and effects.
Chalk paint’s adhesion to laminate is one of its standout features, as it typically requires minimal surface preparation compared to other paints. This means you can achieve a new look for your cupboards without extensive sanding or priming.
The unique finish of chalk paint can transform the look of your kitchen, providing a charming and artistic vibe. This makes it an appealing choice for those looking to achieve a specific aesthetic without investing in new cabinetry.
Durability is a concern with chalk finish paint, as it is more prone to wear and tear unless sealed with a protective topcoat. This step is crucial to ensure that your cupboards withstand daily use and maintain their appearance over time.
As for application, chalk paint’s thick consistency allows for easy maneuvering and coverage, making it a favorite among DIYers. This versatility enables you to work on various projects without needing specialized tools or skills.
Furthermore, chalk paint offers a high degree of customization, as it can be mixed or layered to create unique shades and effects. This provides an opportunity for creativity, allowing you to tailor your cupboards to fit your personal style perfectly.
How About Using Spray Paint on Laminate Surfaces?
When considering the best paint for laminate kitchen cupboards, several options can effectively adhere to and enhance the look of laminate surfaces.
- Chalk Paint: This type of paint is popular for its matte finish and ease of use on laminate surfaces without the need for priming. Its thick consistency allows it to adhere well, providing a vintage or shabby-chic look that can be sealed for durability.
- Spray Paint: Spray paint can be an efficient choice for covering laminate kitchen cupboards due to its fast application and smooth finish. However, it’s essential to use a spray paint formulated specifically for plastic or laminate to ensure proper adhesion and durability.
- Latex Paint: High-quality latex paint is another viable option for laminate surfaces, especially when mixed with a bonding agent. This combination provides excellent coverage and flexibility, allowing for a variety of finishes, and is easily cleaned with soap and water.
- Oil-Based Paint: Oil-based paints offer a durable finish that is resistant to scratches and stains, making them suitable for kitchen environments. However, they require more ventilation during application and longer drying times, which can be a consideration for DIY projects.
- Specialized Primer: Using a specialized primer designed for laminate before painting can significantly improve adhesion and coverage of the paint. This step is crucial as it helps the topcoat to adhere better, resulting in a more durable and long-lasting finish.
- Gel Stain: Gel stains can be used to change the color of laminate without completely covering the original surface, providing a natural wood-like finish. This method requires a topcoat to seal the stain and protect against wear, but it offers a unique aesthetic appeal.
What Preparations Should Be Made Before Painting Laminate Cupboards?
Before painting laminate cupboards, several preparations are essential to ensure a successful and durable finish.
- Cleaning: Thoroughly clean the surfaces to remove grease, grime, and dust. Use a degreaser or a mixture of soap and water, followed by rinsing and drying to ensure no residues remain that could interfere with paint adhesion.
- Sanding: Lightly sand the laminate surfaces with fine-grit sandpaper to create a rough texture. This will help the primer and paint adhere better to the slick laminate surface, improving the longevity of your paint job.
- Priming: Apply a high-quality primer specifically designed for laminate surfaces. This step is crucial as it helps seal the laminate and provides a good base for the topcoat, enhancing adhesion and coverage.
- Choosing the Right Paint: Select the best paint for laminate kitchen cupboards, typically an acrylic or latex-based paint that is durable and suitable for kitchen environments. Consider paints with a satin or semi-gloss finish for easier cleaning and resistance to moisture.
- Protecting Surrounding Areas: Use painter’s tape to mask off areas that you do not want to paint, and lay down drop cloths to protect floors and countertops. This will help in achieving clean edges and prevent accidental spills or splatters.
- Ventilation: Ensure the area is well-ventilated by opening windows or using fans. Proper airflow will help with drying times and minimize exposure to fumes from primer and paint, making the environment safer while you work.
What Are the Best Techniques for Painting Laminate Kitchen Cupboards?
The best techniques for painting laminate kitchen cupboards involve preparation, selection of appropriate materials, and application methods.
- Cleaning and Preparation: Start by thoroughly cleaning the laminate surfaces to remove grease and dirt. Use a degreaser and a fine-grit sandpaper to lightly scuff the surface, which helps the paint adhere better.
- Primer Application: Applying a high-quality bonding primer is crucial for laminate surfaces. This step ensures that the paint sticks effectively and provides a uniform base for the topcoat.
- Choosing the Right Paint: Use a paint specifically designed for laminate or one that can adhere well to non-porous surfaces. Acrylic or urethane paints are often recommended due to their durability and resistance to chipping.
- Using Proper Tools: Opt for high-quality brushes or foam rollers to apply the paint evenly. This reduces the risk of brush strokes and helps achieve a smooth finish.
- Multiple Coats: Apply multiple thin coats of paint rather than one thick coat. This allows for better adhesion and a more even finish, with proper drying time between each coat.
- Finishing Touches: After the paint has dried completely, consider applying a clear topcoat for added protection. This step enhances durability and can give a glossy finish that is easier to clean.
What Finishes Are Recommended for Laminate Kitchen Cabinets?
The best finishes for laminate kitchen cabinets include a variety of options that enhance durability and aesthetics.
- Chalk Paint: This paint provides a matte finish that adheres well to laminate surfaces without the need for extensive priming. It is ideal for achieving a vintage or rustic look, and it can easily be distressed for a more aged appearance.
- Latex Paint: A popular choice due to its ease of application and quick drying time, latex paint is available in numerous colors and finishes. It offers good durability and can be cleaned easily, making it suitable for high-traffic kitchen environments.
- Spray Paint: For a smooth and even finish, spray paint can be an excellent option for laminate cabinets. It allows for quick application and is perfect for reaching intricate areas, but proper ventilation and protective gear are essential during use.
- Oil-Based Paint: Known for its hard, durable finish, oil-based paint provides excellent coverage and longevity. However, it takes longer to dry and requires mineral spirits for cleanup, making it less convenient than water-based alternatives.
- Gel Stain: Gel stain is a unique option that can add depth and richness to laminate cabinets without completely covering the original finish. It works well for those looking to enhance the wood grain appearance while maintaining a stylish look.
What Are Common Mistakes to Avoid While Painting Laminate Cupboards?
When painting laminate cupboards, several common mistakes can hinder the final result.
- Skipping the Prep Work: Many people underestimate the importance of preparing the surface adequately. Failing to clean, sand, or prime laminate can lead to poor paint adhesion and an uneven finish.
- Choosing the Wrong Paint: Not all paints are suitable for laminate surfaces. Using regular latex paint can result in chipping and peeling; instead, opt for a high-quality paint specifically designed for laminate or a good adhesive primer followed by the desired color.
- Neglecting to Use a Primer: Some may skip primer thinking it’s unnecessary, but a bonding primer can significantly enhance paint adherence. This step is crucial for achieving a smooth and durable finish, especially on slick surfaces like laminate.
- Using the Wrong Tools: Using brushes or rollers not suited for smooth surfaces can leave streaks or an uneven texture. Instead, use foam rollers or high-density brushes designed for a smooth finish to maintain a professional look.
- Rushing the Drying Process: Impatience can lead to mistakes; applying additional coats too soon can cause smudging or lifting of the previous layer. Allow adequate drying time between coats as indicated by the paint manufacturer to ensure a flawless outcome.
- Ignoring Environmental Conditions: Painting in an unsuitable environment, such as high humidity or extreme temperatures, can affect how the paint adheres and dries. Aim to paint in moderate conditions to promote optimal curing and adhesion.
- Overlooking Finishing Touches: After painting, some may neglect to apply a protective topcoat. A clear topcoat can safeguard the paint from scratches and wear, extending the life of your newly painted laminate cupboards.