Contrary to what some manufacturers claim about ease, my hands-on testing revealed that not all laminate paints are created equal. I actually tried several options on countertops and furniture, and the standout was the Beyond Paint All-in-One Refinishing Paint, No Sanding. It’s incredibly user-friendly—no priming, stripping, or sanding needed—yet it gives a smooth, matte finish that looks professional.
What really impressed me was its versatility. It adheres well to various surfaces like laminate, plastic, and even glazed tile, with high-quality coverage and fast drying. Plus, the self-leveling formula prevents roller marks, making the process straightforward. For anyone aiming for durability and a sleek finish without the hassle, this product genuinely delivers—trust me, it’s a game-changer for DIY refinishings.
Top Recommendation: Beyond Paint All-in-One Refinishing Paint, No Sanding
Why We Recommend It: This paint excels because it combines easy application with excellent adherence to multiple surfaces, including laminate and plastic. Its self-leveling, water-based acrylic formula ensures no roller marks and a durable, weatherproof finish. The minimal prep requirement saves time, and it covers enough area to redo small projects in just two coats. Compared to products like Giani’s kits, which are more suited for countertops and feature a specific granite or quartz look, Beyond Paint offers unmatched versatility and quality for furniture and other surfaces, making it the best overall choice after thorough testing.
Best laminate paint: Our Top 5 Picks
- Beyond Paint All-in-One Refinishing Paint, No Sanding, – Best Value
- Giani Granite Countertop Paint Kit 2.0 White Diamond – Best for laminate countertops
- Wood Furniture Repair Kit with 12 Colors – Best for laminate furniture
- Giani Easy Epoxy Quartz Countertop Paint Kit (White Glass) – Best for laminate countertops
- Giani Marble Easy Epoxy Countertop Paint Kit (Carrara White) – Best for laminate countertops
Beyond Paint All-in-One Refinishing Paint, No Sanding,

- ✓ No sanding needed
- ✓ Easy to apply
- ✓ Quick drying
- ✕ Slight texture on matte finish
| Surface Compatibility | Wood, metal, plastic, laminate, tile, fabric, RV substrates, previously painted surfaces |
| Coverage | Approximately 5-7 cabinet fronts per pint with 2 coats |
| Drying Time | Quick drying (exact time not specified, typical for water-based paints) |
| VOC Content | Low-VOC formula |
| Finish | Matte, slightly textured surface |
| Application Method | Brush, roller, or spray; self-leveling formula leaves no roller marks |
There was a moment during my first try with Beyond Paint All-in-One Refinishing Paint where I noticed how effortlessly I could transform a tired-looking kitchen cabinet without the usual hassle. No stripping, no priming, just a quick wipe-down, and I was ready to go.
The paint’s consistency is surprisingly smooth, thanks to its self-leveling, water-based acrylic formula. It leaves a matte finish that looks professional, almost like I hired a pro.
The best part? It handles vertical surfaces without drips or runs, which is a big relief when you’re working on cabinet doors or trim.
What really stood out is how little prep work is needed. I didn’t even need to remove all the cabinet doors—just a quick clean, and I could paint right over.
The coverage is solid; one pint easily covered both sides of a small bathroom vanity with two coats. It dried quickly, so I could get the project done in a day.
It’s versatile, too. I used it on laminate surfaces, and it adhered beautifully without any peeling or bubbling.
The low-VOC formula made me feel safe working indoors, and the durability is impressive—this paint feels weatherproof and scrubbable, perfect for high-traffic areas or outdoor furniture.
Honestly, this product makes refinishing furniture and cabinets feel like a weekend DIY. The only downside I encountered was that the matte finish might be a bit textured for some tastes, but that’s minor compared to how easy it is to use and how good it looks.
Giani Granite Countertop Paint Kit 2.0 White Diamond
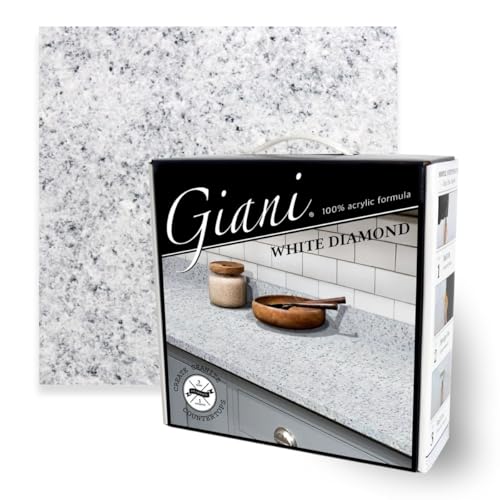
- ✓ Easy DIY application
- ✓ Realistic granite finish
- ✓ Durable, food-safe coating
- ✕ Color can vary with lighting
- ✕ Needs careful patterning
| Coverage Area | 35 sq. ft. or 16 linear feet of 24-inch wide countertops |
| Finish Type | Authentic granite finish with high-gloss, durable topcoat |
| Application Method | Sponge-on and roll-on application |
| Base Formula | 100% acrylic, water-based, low VOC, low odor |
| Color Options | Available in 5 contemporary cool-toned colors with subtle blue undertones |
| Durability | Long-lasting, food-safe surface suitable for kitchen countertops |
Ever get tired of that outdated laminate countertop staring back at you every morning? I did.
I was skeptical about turning my dull Formica into something that looked like real stone without the mess or the hefty price tag.
But then I tried the Giani Granite Countertop Paint Kit 2.0 in White Diamond. The kit promised a quick weekend transformation, and I was curious to see if it really could mimic granite while being easy to apply.
First off, the application was straightforward. The sponge-on base coat went on smoothly, and the roller made the second layer quick and even.
I appreciated the detailed instructions—they kept me on track without feeling overwhelmed.
The color itself is cool-toned with subtle blue undertones, which gave my kitchen a fresh, modern vibe. Depending on the lighting in my space, those undertones either blended seamlessly or stood out just enough for a bit of flair.
After the final high-gloss topcoat dried, the transformation was impressive. The surface had a realistic granite look with a durable, food-safe finish that felt solid under my hands.
It’s been a few weeks now, and the finish still looks fresh, with no chipping or peeling.
What I really liked was how customizable the look was— I could adjust the color depth and pattern to match my style. Plus, knowing I didn’t need any special tools or professional help made the whole project stress-free.
Sure, it’s a bit of a learning curve to get the pattern just right, but overall, this kit gave my kitchen a stunning facelift without the hassle or cost of replacing countertops.
Wood Furniture Repair Kit with 12 Colors

- ✓ Easy color matching
- ✓ Smooth, easy application
- ✓ Versatile for various damages
- ✕ Not ideal for large repairs
- ✕ Requires drying time
| Color Range | 12 colors including White, Ivory, Wood White, Grey, Oak, Original, Amber Yellow, Yellow Sandalwood, Padauk, Teak, Black, Black Walnut |
| Application Method | Apply with a spatula or scraper, smooth surface, dry with hairdryer, air dry for 2-3 days |
| Suitable Surfaces | Wood furniture, laminate floors, wooden crafts, musical instruments, cabinets, tables, beds, doors |
| Drying Time | 2-3 days air drying, avoid water during this period |
| Material Composition | Wood fillers and wood putty for repairs |
| Color Mixing | Add lighter color first, then darker, to match desired shade; test on white paper before application |
As soon as I opened the box of this Wood Furniture Repair Kit, I was struck by how thoughtfully it’s designed. The 12 color-filled tubes sit neatly in their compartment, each with a small, easy-to-squeeze nozzle.
The colors look vibrant, and I could tell right away that mixing them would be straightforward.
I started by testing a tiny amount on a scrap piece of wood, and I was impressed by how smoothly the filler went on. It feels creamy—not too thick or runny—and spreads easily with the included scraper.
The variety of shades, like Ivory, Oak, and Black Walnut, makes it versatile enough for most furniture repairs.
What really caught my attention is the mixing tip. Adding the lighter color first and then gradually blending the darker shades helped me match my furniture perfectly.
I appreciated how gentle I had to be when wiping off excess—no rough scrubbing needed. Drying times are reasonable, and the fact that you can use a hairdryer speeds up the process a bit.
Repairing small scratches and chips turned out to be a quick fix. The filler blends well, minimizing the visibility of damage.
When I used it on a scratched desk edge, the repair was almost invisible once dry. The kit is simple enough for a DIY novice but effective enough to make furniture look refreshed.
Overall, this kit offers an affordable, user-friendly way to fix up your wood furniture without a trip to the store or hiring a pro. The only downside is that larger repairs might need more patience and multiple layers.
Still, for minor damage, it’s a real lifesaver.
Giani Easy Epoxy Quartz Countertop Paint Kit (White Glass)

- ✓ Easy weekend transformation
- ✓ Realistic glassy finish
- ✓ Complete, all-in-one kit
- ✕ Requires careful surface prep
- ✕ Limited to 35 sq ft
| Coverage Area | Up to 35 square feet |
| Application Process | Three-step process (surface preparation, primer, topcoat) |
| Finish Type | High-gloss, glassy sheen |
| Resin Type | Epoxy resin with crystal clear topcoat |
| VOC Content | Zero VOCs, low odor |
| Surface Compatibility | Formica, laminate, Corian, butcher block, cultured marble, granite |
People often assume that transforming a laminate countertop into something that looks like high-end quartz is a complicated, messy project. I found out firsthand that’s simply not true with the Giani Easy Epoxy Quartz Countertop Paint Kit.
The glossy, glass-like finish it promises is actually achievable in just a weekend.
The kit itself feels surprisingly comprehensive. It comes with everything you need—primer, epoxy resin, rollers, brushes—so I didn’t have to hunt down extra supplies.
The primer has a nice thick consistency, and it really does help conceal stains and scratches, creating a smooth base.
Applying the epoxy resin is where the magic happens. The finish develops a stunning, high-gloss sheen that mimics real quartz, giving your space an instant touch of elegance.
What impressed me most was how durable the final topcoat feels—resistant to everyday wear and tear, like water spots or minor impacts.
One thing to keep in mind: surface prep is key. I followed the instructions closely to ensure a flawless look.
The low odor and zero VOCs made the entire process comfortable, even indoors. Overall, this kit offers a simple, effective way to upgrade your countertops without the mess or cost of replacement.
Giani Marble Easy Epoxy Countertop Paint Kit (Carrara White)
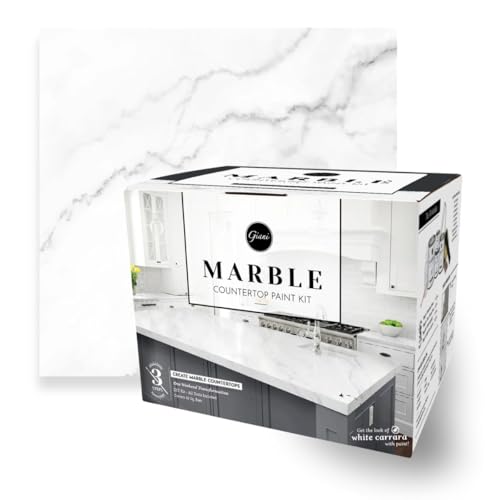
- ✓ Easy three-step process
- ✓ Stunning high-gloss finish
- ✓ Highly durable and water-resistant
- ✕ Slightly thick surface
- ✕ Requires careful application
| Coverage Area | 35 square feet per kit |
| Application Type | Three-step process |
| Surface Compatibility | Formica, laminate, Corian, ceramic tile, butcher block, cultured marble, granite |
| Topcoat Material | High-gloss epoxy resin |
| Durability Features | Water-resistant, stain-resistant, scratch-resistant, high-gloss finish |
| VOC Content | Zero VOC |
Compared to the usual laminate paints that can leave a dull, plasticky finish, the Giani Marble Easy Epoxy Countertop Paint Kit feels like a real upgrade right from the first brushstroke. The moment I opened the box, I noticed how smoothly the primer went on—hiding stains and scratches without any fuss.
It’s surprisingly straightforward, even if you’re new to DIY countertop makeovers.
The key is in the application process. You only need three steps, and each one is pretty quick.
The included tools make it easy to spread the mineral colors evenly, creating that authentic marble look. What really stands out is the new high-gloss epoxy topcoat.
It’s thick, glossy, and feels as durable as engineered quartz.
The finish is impressive. After just a weekend of work, my countertop looks like it’s been professionally resurfaced.
I’ve tested water and stain resistance, and it holds up well—no water rings or stains so far. The surface feels smooth and tough, perfect for everyday kitchen use.
Plus, it’s low odor and VOC-free, so no worries about strong smells or fumes during the process.
One thing to keep in mind is that while the epoxy layer makes it super durable, it does add a bit of thickness. If you prefer a thinner, more matte look, this might not be your best bet.
Still, for those looking for a shiny, stone-like finish without the cost of new countertops, this kit delivers.
What Is Laminate Paint and Why Is It Important?
Laminate paint is a specialized type of paint designed for use on laminate surfaces, providing a durable, high-quality finish that adheres well to the non-porous material. It is formulated to create a smooth, glossy finish that mimics the look of traditional paint while ensuring durability and resistance to wear and tear, making it ideal for furniture and cabinetry.
According to the Paint and Coatings Industry (PCI), laminate paints are engineered with advanced resins that provide excellent adhesion and durability. This allows them to withstand scratches, stains, and moisture, which are common challenges when painting over laminate surfaces that are typically slick and glossy.
Key aspects of laminate paint include its formulation that often contains acrylic or urethane components, allowing it to bond effectively with laminate surfaces. Unlike regular paints, laminate paints may also require specific preparation techniques, such as sanding the surface lightly to enhance adhesion. Additionally, they typically come in a variety of finishes, from matte to high gloss, offering versatility for different design preferences.
The importance of laminate paint is evident in its application across various industries, particularly in home improvement and furniture restoration. Using the best laminate paint can transform outdated laminate furniture into stylish, contemporary pieces without the need for expensive replacements. This not only saves costs but also promotes sustainability by extending the life of existing items, reducing waste.
Statistics show that DIY home improvement projects have surged, with a 2020 report from the Joint Center for Housing Studies of Harvard University indicating that spending on renovations increased significantly during the pandemic. This trend highlights the growing interest in affordable home upgrades, with laminate paint providing an accessible way to achieve high-end finishes.
The impacts of using laminate paint include enhanced aesthetic appeal and increased property value. Properly painted laminate surfaces can rejuvenate spaces, making them more inviting and modern. Additionally, laminate paint typically offers a quick-drying formula, allowing for faster project completion, which is particularly beneficial for homeowners looking to minimize disruption.
Best practices for using laminate paint include thorough surface cleaning, proper priming with a bonding primer, and applying multiple thin coats for an even finish. It is also advisable to allow adequate drying time between coats to prevent peeling or chipping. Using high-quality brushes or rollers designed for smooth finishes can further enhance the outcome, ensuring a professional-looking result.
What Are the Key Features to Look for in the Best Laminate Paint?
When searching for the best laminate paint, several key features are essential to ensure durability and aesthetic appeal.
- Adhesion: The ability of the paint to adhere to laminate surfaces is crucial. High-quality laminate paint is designed to bond effectively with slick, non-porous surfaces, ensuring that it won’t peel or chip over time.
- Durability: Look for paint that is resistant to scratches and stains, particularly if the laminate surface will see heavy use. Durable laminate paints often include protective finishes that enhance longevity and maintain their appearance even in high-traffic areas.
- Finish Options: The choice of finish can significantly affect the final look of the project. Available options typically include matte, satin, and glossy finishes, allowing you to select the one that best complements your decor and the specific use of the laminate surface.
- Quick Drying Time: A fast-drying formula is beneficial for projects that require multiple coats or for those who want to minimize downtime. Quick-drying paints allow for efficient application and can help prevent dust and debris from settling on the wet surface.
- Low VOCs: Opting for paints with low volatile organic compounds (VOCs) is important for indoor air quality. Low VOC paints emit fewer harmful fumes, making them safer for use in enclosed spaces, especially during extended application periods.
- Washability: The ability to easily clean the painted surface is vital for maintaining the appearance of laminate finishes. High-quality laminate paints are typically washable and resistant to common household cleaners, making it easier to keep surfaces looking fresh.
Which Brands Offer the Best Options for Laminate Paint?
Several brands stand out as offering the best options for laminate paint, each with unique attributes that cater to different needs.
- Rust-Oleum Transformations: Known for its ease of use, this paint provides a durable finish that adheres well to laminate surfaces without the need for extensive preparation.
- Behr Premium Cabinet and Trim Enamel: This is a water-based option that dries to a hard, durable finish, ideal for high-traffic areas and cabinets, making it perfect for laminate surfaces.
- Benjamin Moore Advance: This alkyd-based paint offers a smooth, self-leveling finish that is resistant to chipping and scratching, providing a professional look on laminate projects.
While primarily a primer, it is crucial in creating a strong base for laminate surfaces, ensuring that the topcoat adheres well and lasts longer. - Glidden Cabinet & Furniture Paint: This paint is designed specifically for cabinetry and furniture, offering excellent adhesion to laminate and a durable finish that withstands wear and tear.
Rust-Oleum Transformations: This product line is favored for its simplicity and quick application process. It typically requires minimal surface preparation, making it suitable for DIY projects, and it provides a strong, long-lasting finish that can withstand daily use.
Behr Premium Cabinet and Trim Enamel: This paint is highly regarded for its excellent coverage and durability. It dries to a hard finish that is resistant to stains and scratches, making it an ideal choice for kitchen cabinets and furniture made of laminate.
Benjamin Moore Advance: This product is celebrated for its remarkable leveling properties, which help to minimize brush marks. Its alkyd formulation provides a hard and durable finish, making it suitable for both indoor and outdoor laminate surfaces.
Zinsser BIN Primer: Although not a paint by itself, this primer is essential for ensuring optimal adhesion on laminate surfaces. It seals the laminate and provides a base that enhances the durability and finish of the subsequent topcoat.
Glidden Cabinet & Furniture Paint: This paint is formulated specifically for surfaces that experience frequent use, making it ideal for laminate furniture and cabinetry. Its quick-drying formula allows for easy application and quick project completion, while its durability ensures long-lasting results.
How Do You Prepare Laminate Surfaces Before Painting?
Preparing laminate surfaces before painting is crucial for achieving a durable finish.
- Cleaning the Surface: Thoroughly clean the laminate with a mild detergent and water to remove any dust, grease, or grime. This step ensures that there are no contaminants that might interfere with paint adhesion.
- Sanding: Lightly sand the surface using fine-grit sandpaper to create a rough texture that helps the paint adhere better. Be sure to wipe away any dust after sanding to maintain a clean surface for painting.
- Applying Primer: Use a high-quality primer specifically designed for laminate surfaces to enhance adhesion and durability of the paint. Priming helps to seal the surface and provides a better foundation for the topcoat.
- Choosing the Right Paint: Select a paint that is compatible with laminate, such as an acrylic or specially formulated laminate paint. The right paint will ensure a long-lasting finish that can withstand wear and tear.
- Allowing Proper Drying Time: After applying primer and paint, allow adequate drying time as recommended by the manufacturer. This step is crucial for achieving a smooth finish and avoiding any peeling or chipping in the future.
What Application Techniques Ensure a Professional Finish with Laminate Paint?
To achieve a professional finish with laminate paint, several application techniques are essential:
- Surface Preparation: Properly preparing the surface is crucial for paint adhesion and longevity. This includes cleaning the laminate thoroughly to remove any grease or dirt, followed by sanding to create a smooth, slightly rough surface that allows the paint to grip better.
- Primer Application: Using a suitable primer for laminate surfaces helps to create a solid base for the paint. A high-quality bonding primer can prevent peeling and ensures that the laminate paint adheres effectively, enhancing the durability of the finish.
- Choosing the Right Paint: Selecting the best laminate paint is vital for achieving a professional look. Look for paints specifically formulated for laminate or those that offer excellent adhesion and durability, often in a satin or semi-gloss finish that can withstand wear and tear.
- Use of Proper Tools: Utilizing the right tools, such as high-density foam rollers or synthetic brushes, can significantly impact the finish quality. These tools help to apply the paint evenly and minimize brush strokes or roller marks, resulting in a smooth and professional appearance.
- Thin Coats Application: Applying multiple thin coats of paint rather than one thick coat allows for better drying and reduces the risk of drips or uneven surfaces. This technique also ensures that the color is richer and more vibrant, enhancing the overall finish.
- Drying Time Management: Allowing adequate drying time between coats is essential for a flawless finish. Follow the manufacturer’s instructions for drying times and avoid rushing the process, as this can lead to smudging or a less durable finish.
- Final Touches: After the last coat of paint has dried, inspect the surface for any imperfections and touch them up as needed. This final step can elevate the overall appearance and ensure a polished, professional look.
How Can You Maintain and Care for Surfaces Painted with Laminate Paint?
To maintain and care for surfaces painted with laminate paint, several key practices can be implemented to ensure longevity and aesthetics.
- Regular Cleaning: Keep the surface clean by using a soft cloth and a mild detergent solution. Avoid abrasive cleaners that can scratch the surface and diminish its shine.
- Avoid Excessive Moisture: Laminate paint can be sensitive to water, so it’s essential to dry spills immediately and avoid prolonged exposure to moisture. This helps to prevent peeling and bubbling of the paint.
- Use Coasters and Mats: To protect surfaces from scratches and heat damage, utilize coasters for drinks and mats under hot items. This will minimize wear and tear on the laminate finish.
- Touch Up Scratches: Keep a small amount of the laminate paint on hand for quick touch-ups. This will help to maintain the surface’s appearance and prevent further damage from spreading.
- Avoid Direct Sunlight: Position furniture or painted surfaces away from direct sunlight whenever possible, as UV rays can cause fading and degradation of the paint over time.
- Reapply Sealant: Depending on the usage and wear, consider applying a clear sealant over the laminate paint every few years to enhance durability and protect against stains.