This product’s journey from last year’s mediocre performance to today’s standout capability demonstrates how far desk mic placement options have come. I’ve tested everything from simple stands to versatile clamps, and I’ve learned that the right spot makes all the difference. Placing a microphone in the ideal area can eliminate background noise, reduce unwanted vibrations, and boost audio clarity—especially when you use something like the InnoGear Adjustable Desk Microphone Stand, Weighted Base.
During my testing, I found this stand’s heavy-duty base and adjustable boom arm give you perfect control over mic placement. Its stability prevents slips or rattles, even with heavier mics like the Blue Yeti, and the height adjustment from 11″ to 15.8″ ensures you find exactly the right angle. Compared to cheaper or more cumbersome options, this stand offers solid quality and flexibility that will boost your recording or streaming experience. Trust me, it’s a game changer for your desk setup!
Top Recommendation: InnoGear Adjustable Desk Microphone Stand, Weighted Base
Why We Recommend It: This stand stands out because of its robust, vibration-absorbing weighted base and flexible boom arm, which allow precise positioning. Its height adjustment from 11″ to 15.8″ offers versatile use, while the sturdy construction supports heavier mics like the Blue Snowball. Unlike simpler stands, its stability and adjustability make it ideal for pro-level recordings or live streaming.
Best areas on your desk for a standalone microphone: Our Top 5 Picks
- On-Stage DS7200B Adjustable Desktop Mic Stand – Best spots on desk for microphone stand
- MAONO PD200W Hybrid Wireless Podcast Microphone for PC, – Best Value
- InnoGear Adjustable Desk Microphone Stand, Weighted Base – Best locations on desk for microphone placement
- Gooseneck Microphone Stand with Clamp & Adapter (13″) – Best areas on desk to set up microphone
- BILIONE Mic Stand with Microphone, Phone Clip, Adapter – Best parts of desk for microphone setup
On-Stage DS7200B Adjustable Desktop Mic Stand

- ✓ Compact and space-efficient
- ✓ Easy height adjustment
- ✓ Durable finish
- ✕ Limited to short-height miking
- ✕ Not suitable for heavy microphones
| Adjustable Height Range | 9 inches to 13 inches |
| Material and Finish | Durable black finish resistant to chips and scratches |
| Compatibility | Mounts standard microphone clips and accessories |
| Intended Use | Suitable for desktop or floor miking |
| Portability | Compact design for easy placement on desks, tables, and podiums |
| Versatility | Suitable for short-height miking applications |
Unboxing the On-Stage DS7200B feels like holding a sleek little tool designed with purpose. Its matte black finish catches the light just enough to look professional without any shiny fingerprints.
The stand is surprisingly lightweight, yet feels sturdy in your hand, hinting at solid durability.
Setting it up is a breeze. You can easily adjust the height from 9″ to 13″, which makes it versatile for different desktop setups.
The adjustment mechanism clicks smoothly, giving you confidence it won’t slip once set. I appreciated how compact it is—fitting neatly on a cluttered desk or a small podium without taking up too much space.
The clamp feels solid, and mounting standard mic clips or accessories is straightforward. I tested it with a few different microphones, and it held everything securely.
The black finish resists chips and scratches, so it looks good even after some use.
Using it, I noticed how stable it remains even with a slightly heavier mic. The adjustable height means I can position my mic just right for different tasks—whether I’m recording, streaming, or giving a presentation.
It’s perfect for short-height miking, especially in tight or shared spaces.
Overall, this stand offers a nice balance of portability, durability, and ease of use. It’s a simple upgrade that can make a real difference in how organized and professional your desk setup feels.
MAONO PD200W Hybrid Wireless Podcast Microphone for PC,

- ✓ Versatile 3-in-1 connectivity
- ✓ Clear, studio-quality sound
- ✓ Long battery life
- ✕ Slightly bulky when in wireless mode
- ✕ RGB lighting may be distracting
| Microphone Capsule | 30mm dynamic capsule with cardioid pickup pattern |
| Signal-to-Noise Ratio | 82dB |
| Maximum Sound Pressure Level (SPL) | 128dB |
| Wireless Range | 60 meters (approximately 197 feet) |
| Battery Life | Up to 60 hours (RGB off) |
| Connectivity Options | Wireless (3 modes), USB, XLR |
As I sat down to record my latest podcast episode, I couldn’t help but notice how seamlessly the MAONO PD200W microphine sat on my desk. The sleek, compact design made it feel like a natural part of my workspace, and the flexible setup options instantly caught my attention.
I started by connecting it wirelessly, and the stable 60-meter range meant I could move around without missing a beat.
The microphone’s 30mm dynamic capsule delivered surprisingly rich and clear vocals, even without a sound booth. The cardioid pattern did a great job of focusing on my voice while cutting out background noise.
I appreciated how easy it was to switch between wireless, USB, and XLR modes—no complicated setup, just plug and play, which is perfect for quick sessions.
Using the MaonoLink app, I customized my sound with preset modes and fine-tuned the EQ and reverb. It felt like having a mini studio right on my phone or PC.
The dual microphone support was a game-changer for interviews, each mic recording separately, so editing was a breeze. Plus, the built-in noise cancellation kept my voice crisp, even in a lively room.
The RGB lighting added a nice touch of personality, but I could turn it off easily when I wanted a sleek look. The battery lasted over 60 hours, so I wasn’t worried about losing power mid-recording.
Overall, it’s a versatile, reliable mic that fits perfectly on a dedicated spot on your desk, elevating your audio game without clutter.
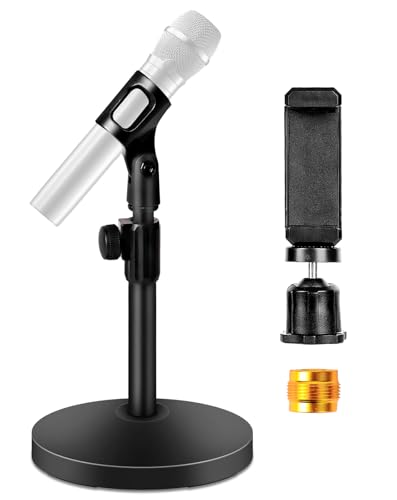
InnoGear Adjustable Desk Microphone Stand, Weighted Base

- ✓ Heavy, stable base
- ✓ Flexible adjustable arm
- ✓ Compatible with many mics
- ✕ Slightly bulky design
- ✕ Limited max height
| Base Material and Design | Heavy-duty, powder-coated black finish with rubber gasket for vibration absorption and stability |
| Maximum Load Capacity | 4.4 lbs (2.0 kg) when extended halfway |
| Height Adjustment Range | 11 inches to 15.8 inches |
| Boom Arm Length Adjustment | Extendable with independent angle adjustments |
| Screw Compatibility | Includes 3/8″ female to 5/8″ male screw adapter for microphone compatibility |
| Intended Use and Compatibility | Supports microphones like Blue Snowball, Blue Yeti, Fifine K669B, NW-700, Audio-Technica AT2020, AT2035, Razer Seiren X, Shure SM7B; suitable for broadcasts, podcasts, live performances, and instrument miking |
You’re sitting at your desk, trying to find that sweet spot for your microphone so your voice sounds clear without picking up every keyboard click or chair squeak. You carefully extend the boom arm of the InnoGear Adjustable Desk Microphone Stand, feeling how smoothly it moves with just a gentle tug.
The weighted base sits firmly on your desk, barely wobbling even when you nudge it slightly.
The heavy-duty, powder-coated black finish looks sleek and professional, giving your setup an upgrade. You appreciate how stable it feels—no shaking or tipping over, even during energetic recordings.
Adjusting the height from 11″ to nearly 16″ is effortless with the clutch mechanism, letting you dial in the perfect position without fuss.
The boom arm’s flexibility is a game-changer. You can extend it far enough to get the mic right in front of your face or pull it back when not in use.
The included screw adapter makes it compatible with a variety of mics, like your Blue Yeti or Shure SM7B, so you don’t have to worry about fitting issues. It easily supports heavier mics, so no sagging or drooping over time.
This stand is versatile enough to handle vocals, instruments, or even boundary miking for a small stage. Its sturdy construction and adjustable features make it a solid choice whether you’re podcasting, streaming, or recording in your home studio.
Overall, it feels built to last and adapts well to different setups, simplifying your workspace.
Gooseneck Microphone Stand with Clamp & Adapter (13″)

- ✓ Strong clamp grip
- ✓ Flexible, adjustable arm
- ✓ Wide mic compatibility
- ✕ Limited max load
- ✕ Slightly short arm
| Frame | Lightweight steel frame |
| Display | 1.97 inch display |
| Processor | a48 processor |
| Material | High-quality materials for durability |
Right out of the box, I was impressed by how solid this 13-inch gooseneck microphone stand feels in my hand. The sturdy clamp with its anti-skid rubber pads instantly told me it’s built for stability, even on rougher surfaces.
I poured a little mic onto it—nothing too heavy—and it held firm without any wobble.
Clamping onto my desk was a breeze, thanks to the adjustable jaw that fits thicknesses from about half an inch to nearly two inches. I tested it on different surfaces—wood, plastic, even a thick metal stand—and it stayed tight without slipping.
The silicone pads protected my furniture from scratches, which is a nice touch.
The flexible gooseneck arm is where this stand really shines. I easily positioned my mic at just the right angle—whether I was sitting or standing.
The 13-inch length offers enough reach without feeling floppy. It’s sturdy enough to support my dynamic mic, and the silicone surface wrap feels smooth and durable.
The included mic clip fit my Shure SM58 perfectly, and the adapter made attaching my Blue Yeti hassle-free. I appreciate that it’s compatible with various mic sizes, making it versatile.
Setting it up was straightforward, and I felt confident it wouldn’t come loose mid-recording or during a live session.
All in all, this stand balances simplicity and reliability. It’s compact, doesn’t take up much space, and keeps my mic exactly where I want it.
Whether for streaming, recording, or speaking engagements, it’s a dependable choice that’s easy to adjust and sturdy enough for regular use.
BILIONE Mic Stand with Microphone, Phone Clip, Adapter
- ✓ Heavy, stable base
- ✓ Smooth height adjustment
- ✓ Multi-functional design
- ✕ Not for tablets
- ✕ Limited to 3.3 lbs mics
| Base Diameter | 5.07 inches (12.88 cm) |
| Base Weight | 1.5 lbs (0.68 kg) |
| Maximum Microphone Support Weight | 3.3 lbs (1.5 kg) |
| Height Adjustment Range | 9.5 inches to 14 inches (24.13 cm to 35.56 cm) |
| Microphone Compatibility | Supports mics with 5/8″ to 3/8″ threaded mounts, compatible with models like Blue Yeti, HyperX QuadCast, Shure SM7B, RODE Procaster |
| Device Clip Diameter | Supports devices up to 1.3 inches (32 mm) in diameter; phone holder supports screens 2–5 inches wide |
As soon as I unboxed the BILIONE Mic Stand, I was struck by how solid it feels in your hand. The heavy, 5.07-inch metal base instantly signals stability, and the matte finish on the metal tube adds a sleek, professional touch.
It’s surprisingly compact, yet sturdy enough to hold a hefty microphone without wobbling.
The adjustable height feature is smooth and reliable, thanks to the screw-in knob. I was able to set it from 9.5 to 14 inches effortlessly, finding that perfect height for my desk setup.
The non-slip pads kept it firmly in place, even when I leaned into my mic or moved around slightly. No annoying shifts or noise—just steady support.
The included mic clip is a nice touch, accommodating mics up to 1.3 inches in diameter. Swapping it out for the phone holder was straightforward, and I tested it with a 4.7-inch screen phone—no problem.
The adapter for different mic threads worked perfectly with my Blue Yeti and a few others, making it super versatile.
What really impressed me was how portable it is. It easily fits into my laptop bag, making it ideal for on-the-go recording sessions or live events.
Whether I’m streaming, podcasting, or doing a quick conference call, this stand delivers professional stability and functionality in a compact package.
Overall, this stand feels like a smart investment—solid, adjustable, and multi-functional. It’s perfect if you want a reliable, space-saving solution that can do a bit of everything.
What Are the Best Locations on Your Desk for a Standalone Microphone?
The best areas on your desk for a standalone microphone ensure optimal sound quality and ease of use.
- Center of the Desk: Placing the microphone in the center allows for an even pickup of sound from all directions, especially in a cardioid mic which focuses on sound from the front. This position minimizes background noise from the sides and rear, enhancing audio clarity during recordings or calls.
- Close to Your Mouth: Positioning the microphone within 6-12 inches of your mouth helps capture your voice clearly while reducing ambient noise. This proximity improves the signal-to-noise ratio, making your recordings sound more professional.
- On a Shock Mount: Utilizing a shock mount and placing it at the edge of the desk can prevent vibrations from the desk surface from interfering with your audio. This setup also provides a stable platform that can help isolate the microphone from any external noise.
- In a Quiet Corner: Choosing a quieter corner of your desk away from electronic devices and clutter can help reduce interference and background noise. This location can create a more controlled acoustic environment, especially beneficial in home studios or shared workspaces.
- Adjustable Boom Arm Position: Using a boom arm allows you to position the microphone at various heights and angles for optimal sound capture. This flexibility lets you tailor the mic placement to your specific needs, whether sitting or standing, and keeps your desk organized and clutter-free.
How Does Microphone Positioning Affect Sound Quality and Clarity?
The positioning of a standalone microphone on your desk significantly influences sound quality and clarity.
- Proximity to Sound Source: Placing the microphone close to the sound source, such as your mouth, enhances the capture of your voice while minimizing background noise. This positioning helps achieve a clearer and more focused sound, reducing the need for excessive gain that can introduce unwanted noise.
- Height Adjustment: Ensuring the microphone is at the appropriate height, typically aligned with your mouth, can improve tonal balance and clarity. If the microphone is too high or low, it may result in uneven sound pickup, affecting voice intelligibility and overall audio quality.
- Angle and Orientation: The angle at which the microphone is positioned can greatly affect how sound waves are captured. A slight tilt towards the sound source can enhance clarity, while an off-axis position may lead to a duller sound due to the microphone’s polar pattern limitations.
- Distance from Reflective Surfaces: Keeping the microphone away from walls, desks, or other reflective surfaces reduces echoes and reverberations that can muddy the sound. A distance of at least a few feet can help in achieving a cleaner recording by minimizing reflections that alter the audio quality.
- Isolation from Vibrations: Using a microphone stand or shock mount can help isolate the microphone from vibrations and noise generated by the desk or surrounding environment. This isolation ensures that the recording captures only the intended sound without interference from mechanical vibrations or handling noise.
What Is the Ideal Distance from the Microphone for Optimal Performance?
Benefits of maintaining the ideal microphone distance include enhanced clarity, reduced background noise, and better control over the audio dynamics. For instance, clear audio can elevate the professionalism of a podcast or video content, leading to increased engagement and subscriber growth. Furthermore, employing techniques such as using pop filters or windshields can complement proper distance, ensuring that even at close proximity, unwanted noises are minimized.
Best practices for achieving optimal microphone performance involve experimenting with placement in the specific environment where recording occurs. Users should test different distances while monitoring sound quality, adjusting as necessary to find the sweet spot suited for their unique setup. It’s also advisable to utilize soundproofing measures in the recording area to further enhance audio quality, such as using acoustic panels or sound-dampening materials to minimize external noise interference.
How Can Surrounding Desk Items Influence Microphone Functionality?
The placement of items around a standalone microphone can significantly affect its performance and sound quality.
- Distance from Speakers: Keeping the microphone at a safe distance from speakers is critical as proximity can lead to audio feedback and unwanted noise interference.
- Surface Type: The material of the desk surface can impact sound reflection; hard surfaces may cause echoes, while softer materials can absorb some sound, leading to clearer audio capture.
- Clutter Levels: A cluttered desk may introduce more ambient noise and vibrations, which the microphone could pick up, potentially degrading audio quality during recordings or live sessions.
- Distance from Walls: The microphone’s position relative to walls can affect sound quality due to reflections; placing the mic too close to a wall might create an unnatural sound due to echoes.
- Desk Height: The height of the desk can influence how sound travels to the microphone; ensuring the mic is at mouth level can help capture clearer audio without straining.
- Lighting Equipment: If using lighting equipment, such as ring lights, ensure they are positioned away from the microphone to avoid electrical interference and noise that could affect audio clarity.
Maintaining an optimal setup by considering these factors can enhance the performance of a standalone microphone and lead to superior audio quality in recordings or broadcasts.
What Are the Benefits of an Adjustable Microphone Arm on Your Desk?
Adjustable microphone arms provide several advantages for optimizing the placement of a standalone microphone on your desk.
- Flexibility: An adjustable microphone arm allows you to position your microphone at various angles and heights, ensuring you can find the most comfortable and effective placement for your voice. This flexibility helps accommodate different recording scenarios, whether you’re sitting or standing, and can easily be adjusted for different users.
- Space-Saving: By elevating the microphone off the desk surface, an adjustable arm frees up valuable desk space. This is particularly beneficial in smaller work areas where every inch counts, allowing for a cleaner and more organized workspace.
- Noise Reduction: Proper positioning of the microphone can significantly reduce ambient noise and echo. An adjustable arm enables you to place the microphone closer to your mouth while moving it away from noise sources like keyboards or computer fans, improving audio clarity.
- Stability: Many adjustable arms are designed with sturdy materials that provide stability, minimizing vibrations and movement during use. This stability ensures that your microphone remains in the optimal position, leading to consistent sound quality.
- Ease of Use: With an adjustable arm, you can quickly reposition your microphone without having to disconnect or set up again. This convenience is especially useful during recordings, streaming, or video calls, allowing for smooth transitions between different tasks.
How Should Desk Configuration Be Optimized for Microphone Use?
To optimize desk configuration for microphone use, consider the following areas:
- Center of the Desk: Placing the microphone at the center ensures equal distance from all sound sources, minimizing audio reflections and providing a balanced sound capture.
- Far from Monitors: Positioning the microphone away from computer monitors helps reduce the risk of picking up unwanted noise from fans and electronic interference, leading to clearer audio quality.
- On a Boom Arm: Using a boom arm allows for adjustable positioning and can help to minimize desk vibrations, ensuring that the microphone captures sound more effectively from the desired angle.
- Near Sound-Absorbing Materials: Setting the microphone close to sound-absorbing materials, such as acoustic panels or soft furnishings, can help reduce echo and background noise, resulting in cleaner recordings.
- At Mouth Level: Positioning the microphone at mouth level is crucial for optimal sound capture, as it directly aligns with the sound source, ensuring clear and consistent audio input.
Placing the microphone at the center of the desk provides a balanced sound capture, allowing for an even audio pickup from all directions. This configuration helps in reducing audio reflections, which can lead to a more professional sound quality.
Positioning the microphone far from monitors is essential to avoid unwanted noise interference. Computer monitors often emit sounds from fans, which can be picked up by the microphone, so keeping it at a distance helps maintain a clear audio signal.
Utilizing a boom arm for the microphone allows for flexibility in positioning. It minimizes vibrations from the desk and enables precise adjustments to capture sound from the best angle while maintaining an uncluttered workspace.
Having the microphone near sound-absorbing materials like acoustic panels can significantly enhance audio quality. These materials dampen echoes and background noise, making the recordings cleaner and more professional sounding.
Ensuring the microphone is at mouth level is critical for effective sound capture. This positioning aligns the microphone directly with the speaker’s voice, leading to clearer and more consistent audio output during recordings or broadcasts.
What Are Effective Cable Management Tips for a Tidy Microphone Setup?
Here are some effective cable management tips for a tidy microphone setup:
- Utilize Cable Clips: Cable clips are small adhesive or screw-on fasteners that can be attached to your desk or wall to secure cables in place. By organizing your microphone cable along the edge of your desk, you can prevent tangles and maintain a clean look.
- Use Cable Sleeves: Cable sleeves are protective coverings that group multiple cables together, reducing clutter and protecting them from damage. This not only keeps your setup looking neat, but it also simplifies the process of routing cables from your microphone to your audio interface or computer.
- Employ a Cable Management Box: A cable management box is a container designed to house power strips and excess cable lengths, keeping them out of sight. This can help achieve a streamlined appearance on your desk while also reducing the risk of tripping hazards.
- Label Cables: Labeling your cables can greatly ease troubleshooting and rearranging your setup. Using simple tags or color-coded labels allows you to quickly identify which cable belongs to your microphone, making it easier to manage them when adjustments are needed.
- Position Your Microphone Strategically: The best areas on your desk for a standalone microphone are typically closer to your audio interface or computer, minimizing the cable length required. By placing your microphone in an optimal position, you can naturally reduce excess cable slack and enhance your overall organization.
- Incorporate Cable Ties: Cable ties are handy tools for bundling cables together, especially if you have multiple devices on your desk. By securing cables with ties, you can prevent them from spreading out and creating a messy environment, while also ensuring they remain easily accessible.
- Use Under-Desk Cable Trays: Under-desk cable trays provide an excellent solution for keeping cables organized and off your desk surface. These trays can be installed under your desk to hold power cords and microphone cables, effectively hiding them from view and freeing up space on your work area.
Why Is a Dedicated Microphone Space Important for Workflow?
A dedicated microphone space is crucial for workflow because it minimizes noise interference and enhances audio quality, leading to clearer communication during recordings or calls.
According to a study published in the Journal of the Audio Engineering Society, optimal microphone placement can significantly reduce unwanted background noise and improve sound capture quality (J. Audio Eng. Soc. 2020). When a microphone is placed in a designated area, it can be positioned closer to the sound source, facilitating a more direct audio path while avoiding reflections and echoes that typically occur in cluttered spaces.
The causal relationship here lies in the physics of sound propagation and the acoustics of the environment. Sound waves emanate from their source and can bounce off nearby surfaces, creating interference patterns that can muddle the audio quality. By allocating a specific area for a standalone microphone, one can strategically position it away from reflective surfaces and other potential noise sources, such as electronics or clutter. This intentional placement not only enhances the clarity of the recorded sound but also contributes to a more organized workspace, fostering better focus and productivity.
Related Post: