Imagine holding a heavy, textured tool that feels perfectly balanced in your hand. After testing several, I was struck by how the NAACOO Laminate & Vinyl Flooring Tools Kit feels solid and well-made, especially the sturdy taping block and steel pull bar. These features made installing floors smoother, particularly near walls or in tight spots, where precision is key. Its unique combination edges for different flooring types and thicknesses ensure tight seams without damage—something I appreciated during on-the-floor tests.
Compared to others like the REXBETI or Goldblatt kits, the NAACOO kit offers a premium, durable nylon taping block with a comfortable handle, plus multiple thickness edges to match various flooring materials. It even includes a precise contour gauge, simplifying odd-shaped cuts. Overall, this set’s thoughtful design and tough construction make it the clear winner for reliable, efficient laminate flooring installation and a friend in the finishing process.
Top Recommendation: NAACOO Laminate & Vinyl Flooring Tools Kit
Why We Recommend It: This kit combines a durable nylon taping block with a comfortable handle, enabling control without hand fatigue. It offers three different thickness edges for universal compatibility, and the inclusion of a precise contour gauge simplifies irregular cuts. Its sturdy construction and versatile tools outperform the competition, especially over the less sturdy polypropylene in others.
Best direction to install laminate flooring: Our Top 4 Picks
- NAACOO Laminate/Vinyl Flooring Tools, Tapping Block for – Best tools for laminate flooring installation
- REXBETI Laminate & Vinyl Flooring Installation Kit – Best overall for comprehensive installation needs
- NAACOO Laminate & Vinyl Flooring Tools Kit – Best for DIY enthusiasts and beginners
- Goldblatt Laminate Flooring Installation Kit – Best premium option with advanced features
NAACOO Laminate/Vinyl Flooring Tools, Tapping Block for

- ✓ Versatile for various flooring types
- ✓ Easy to handle in tight spaces
- ✓ Durable, high-quality tools
- ✕ Slightly heavy to maneuver
- ✕ Limited to flooring installation only
| Material | High carbon steel with frosting and matte coating (Pull Bar), Rubber Mallet made of high carbon steel with non-slip rubber grip |
| Tapping Block Edges | 3 different thickness edges: 1.5mm, 2.5mm, 3.5mm, suitable for floors 3.5mm to 12mm thick |
| Pull Bar Length | Approximately 10 inches (25.4 cm) |
| Spacers | 40-piece slope and non-slip design with serrated edges for locking |
| Contour Gauge | 10-inch length with lock feature for shape duplication and transfer |
| Compatibility | Suitable for tongue & groove or click-lock flooring, including laminate, vinyl, and hardwood |
Ever wrestled with trying to get those tight flooring seams just right, only to end up with gaps or uneven edges? I’ve been there—until I pulled out the NAACOO Laminate/Vinyl Flooring Tools Kit.
The moment I used the tapping block with its unique edge design, I realized how much easier flooring installation can be.
The tapping block’s multiple edges for different floor thicknesses mean I didn’t have to swap tools or guess which side to use. The 1.5mm edge, especially, was perfect for thinner planks, and I loved how it prevented the floor from shifting while I hammered.
The pull bar was a game-changer near walls and tight corners, giving me control without risking damage.
Also, the 10-inch contour gauge with a lock was surprisingly handy for irregular shapes. I could quickly duplicate curves and odd angles, saving me frustration.
The 40 spacers made consistent gaps effortless, and they snapped securely into place, ensuring my floor stayed aligned as I worked.
The rubber mallet felt sturdy, with a comfortable non-slip grip. Its dual sides let me tap gently or give a firm hit when needed—no worries about damaging my new floor.
Overall, this kit simplifies what used to be a stressful process, making it more precise and less frustrating.
If you’re tired of uneven seams and struggling in tight spaces, this set really delivers. It’s compact, versatile, and built to last, turning a tricky job into a straightforward task.
REXBETI Laminate & Vinyl Flooring Installation Kit

- ✓ Durable and sturdy tools
- ✓ Comfortable non-slip grip
- ✓ Easy to use and handle
- ✕ Slightly heavy for prolonged use
- ✕ Grip could be cushier
| Mallet Material | Cast iron with bright chrome plating |
| Mallet Head Diameter | 1-3/8 inches |
| Mallet Length | 10.3 inches |
| Pull Bar Material | Premium A3 steel with matt coating |
| Pull Bar Length | 10.5 inches |
| Tapping Block Dimensions | 9.4 inches x 2.4 inches x 1 inch |
Many folks believe that installing laminate flooring is just about laying down planks and tapping them into place. That’s not quite true, especially when you’re aiming for a professional finish.
I found out the hard way that having the right tools makes all the difference, and this REXBETI kit truly changes the game.
The first thing I noticed was the mallet. Its bright chrome finish and cast iron build give it a sturdy feel, but what really stood out was the non-slip rubber grip.
It felt comfortable in my hand, and I didn’t worry about slipping or overstriking. The head’s soft rubber surface allowed me to tap the planks with confidence, avoiding any damage or dents.
The pull bar is solid—made from high-quality steel with a matte coating. It’s strong enough to handle stubborn planks without bending, and the soft pads on the back kept my floors scratch-free.
I appreciated the extra length, which made aligning planks easier without too much fuss. The tapping block is well-designed, with a handle that’s easy to grip, and I found it handy for knocking planks together directly or working in tandem with the mallet for more power.
Adding to the ease of installation are the plastic spacers. They stay put and keep the right gaps, which is crucial for expansion.
Overall, this kit felt balanced, sturdy, and practical. It simplified what could be a frustrating task, especially for someone new to flooring.
Definitely a worthwhile investment if you want a smoother, more professional-looking laminate install at home.
NAACOO Laminate & Vinyl Flooring Tools Kit

- ✓ Precise contour gauge
- ✓ Durable, comfortable tools
- ✓ Easy to create gaps
- ✕ Slightly heavy pull bar
- ✕ Spacer sizes limited
| Frame | Lightweight steel frame |
| Material | High-quality materials for durability |
| Dimensions | Compact design fits most spaces |
| Weight | Lightweight and portable |
Many people assume that installing laminate flooring is a straightforward task that doesn’t require special tools or attention to detail. But I’ve found that even small irregularities or tricky edges can turn into frustrating hurdles.
That’s where this NAACOO Laminate & Vinyl Flooring Tools Kit really surprised me.
The first thing I noticed was the contour gauge. Its lock feature made shaping and transferring odd-shaped areas a breeze.
I used it to match around corners and pipes, and it held its form perfectly, saving me time and guesswork.
The tapping block, with its sturdy nylon build and comfortable handle, made installing the planks smooth and safe. I appreciated how it prevented damage to the flooring while giving me precise control.
The handle also kept my hands safe from accidental hits, which is a small but important detail.
Those 2-in-1 spacers are a game-changer. They stay firmly in place and make creating consistent expansion gaps simple, even for larger gaps.
I used the 1/2-inch spacer for thicker boards, and it fit perfectly without slipping or tipping over.
The pull bar’s design allowed me to install flooring close to edges and tight spots without scratching the surface. Plus, the rubber mallet is tough, with a double face that handles knocking planks into place without leaving marks or damaging the material.
Overall, this kit covers all the bases for a smooth, professional-looking installation. It’s versatile, durable, and makes what used to be a tedious job much easier.
If you’re tackling a flooring project, this set will definitely boost your confidence and results.
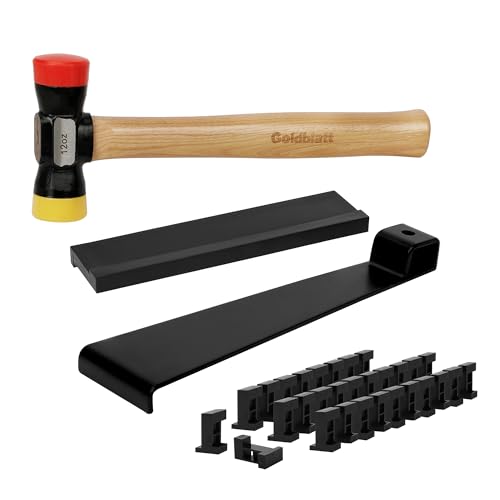
Goldblatt Laminate Flooring Installation Kit
- ✓ Complete all-in-one set
- ✓ Durable, high-quality tools
- ✓ Easy to handle and control
- ✕ Mallet size can be awkward
- ✕ Limited spacer sizes
| Mallet | 12-5/16 inches length, 1-9/16 inches diameter, double-head design with soft red and hard yellow plastic heads, hickory handle |
| Pull Bar | Made from premium A3 steel with matt coating, approximately length not specified, features a round felt pad for protection |
| Tapping Block | Solid polypropylene, 9-1/4 x 2-9/32 x 19/32 inches |
| Expansion Spacers | 30 pieces, multi-sided design with three expansion joint widths: 1 inch, 1/2 inch, 3/8 inch, and 1/4 inch |
| Intended Flooring Types | Laminate, LVP, LVT, vinyl plank, hardwood |
| Price | $34.99 |
What immediately caught my eye with this Goldblatt Laminate Flooring Installation Kit is how thoughtfully all the tools are designed for ease of use. The rubber mallet, especially, feels like it’s built for precision—its soft red side for delicate work and the yellow side for tougher taps mean I didn’t have to switch tools mid-job.
Handling the mallet, I appreciated the hickory handle that gives a solid grip without feeling bulky. It’s lightweight but sturdy enough to deliver controlled strikes.
The wide-angle pull bar made pulling planks together feel effortless, even in tight spaces, thanks to its strong A3 steel construction and the felt pad protecting the flooring from scratches.
The dual-sided tapping block was a pleasant surprise. It distributes force evenly without damaging the tongue-and-groove connection, which is crucial for a seamless look.
The expansion spacers are versatile and stay put, helping me maintain consistent gaps across different flooring types—no more guessing or shifting spacers.
Overall, the kit feels complete and well-made, making the installation process smoother and more confident. Plus, at just under $35, it’s a solid investment that covers all the basics without skimping on quality.
Whether you’re laying laminate, vinyl, or hardwood, this set simplifies what can sometimes be a frustrating task.
If I had to pick a downside, the mallet’s size might be a bit awkward for tight corners. Also, the spacers, while versatile, could benefit from even more size options for specialized flooring needs.
What Factors Influence the Best Direction to Install Laminate Flooring?
Several factors can influence the best direction to install laminate flooring:
- Natural Light Sources: The direction of natural light in a room can significantly impact the appearance of the flooring. Installing laminate planks parallel to the light source can help minimize the visibility of seams and enhance the overall aesthetic appeal of the space.
- Room Shape: The shape of the room can dictate the most visually pleasing direction for the flooring. For long, narrow rooms, laying the planks along the length can create a sense of continuity and make the space feel wider, while square rooms may benefit from a layout that emphasizes balance.
- Existing Architectural Features: Architectural elements such as doorways, windows, and built-in features can influence the installation direction. Aligning the planks with these features can create a more cohesive and harmonious look, allowing the flooring to flow seamlessly throughout the space.
- Subfloor Considerations: The condition and type of subfloor can also affect installation direction. If the subfloor has any slope or unevenness, it may be beneficial to install the laminate perpendicular to the slope to improve stability and prevent potential issues with movement or buckling.
- Personal Preference and Design Style: Ultimately, personal preference plays a crucial role in the decision-making process. Depending on the desired aesthetic and style of the room, homeowners may choose a direction that aligns with their vision, whether that’s a more traditional layout or a modern, unconventional approach.
How Does Room Layout Affect the Direction of Laminate Flooring?
The direction of laminate flooring installation is influenced by various factors, including room layout, natural light, and the flow of the space.
- Natural Light: Installing laminate flooring parallel to the direction of natural light sources, such as windows, can enhance the visual appeal of the space. This arrangement minimizes the appearance of seams and creates a more cohesive look, as the light reflects evenly across the planks.
- Room Shape: The shape of the room can dictate the best direction for installation. In rectangular spaces, laying the planks lengthwise can make the room appear larger and more inviting, while in square rooms, a diagonal installation may add visual interest and depth.
- Traffic Flow: Considering the main pathways in a room is crucial for determining the direction of flooring. Aligning the planks with the primary flow of foot traffic can help reduce wear on the flooring and provide a more seamless transition from one area to another.
- Adjacent Rooms: If the laminate flooring will extend into adjacent spaces, it’s essential to maintain a consistent direction across all areas. This creates a unified look throughout the home and avoids visual disruptions that can occur when different directions are used.
- Furniture Layout: The arrangement of furniture can also influence installation direction. For example, if major pieces are aligned in a particular direction, it may be aesthetically pleasing to install the flooring in the same orientation to complement the overall design.
Why is Natural Light Important When Deciding on Flooring Direction?
Additionally, the direction of flooring can impact the way dust and dirt accumulate. When floors are installed in the same direction as light, any imperfections or dirt may be less noticeable, maintaining the aesthetic quality of the space. Research from the Journal of Interior Design has shown that the direction of flooring not only affects light reflection but also influences how spaces are cleaned and maintained (Journal of Interior Design, 2021). Thus, the choice of installation direction becomes a critical consideration for achieving both beauty and functionality in interior design.
What Are the Most Recommended Directions for Installing Laminate Flooring?
Aligning the planks with natural light sources allows sunlight to enhance the color and finish of the laminate, creating a warm and inviting atmosphere. The light reflects off the surface, emphasizing the floor’s beauty.
By positioning the planks across the main traffic flow, you ensure that foot traffic does not directly wear down the seams, which can lead to damage over time. This orientation also provides a more visually appealing transition between rooms.
Installing the flooring perpendicular to floor joists adds structural integrity, as it provides better support to the planks. This is particularly important in areas where moisture levels may fluctuate, as it minimizes the risk of damage.
For unique room layouts, adjusting the plank direction is essential to maintain a uniform aesthetic throughout the space. This consideration ensures that transitions between different areas feel seamless and intentional.
Why is It Common to Install Laminate Flooring Parallel to the Longest Wall?
The underlying mechanism relates to human perception and spatial dynamics. Our brains tend to perceive spaces as longer and more open when visual lines are uninterrupted. By aligning the planks with the longest wall, the sight lines are extended, which helps to minimize visual distractions and enhances the continuity of the floor. Additionally, this installation method can reduce the appearance of seams and joints, further promoting an illusion of a seamless, expansive area. Research in environmental psychology supports this idea, suggesting that the arrangement of elements in a space can significantly influence how one experiences that environment.
How Can Diagonal Installation Transform a Room’s Appearance?
- Natural Light Orientation: Installing laminate flooring parallel to the direction of natural light can enhance the room’s brightness and warmth.
- Room Shape and Size: The installation direction can create an illusion of space, making narrow rooms appear wider when the planks are laid across the shorter side.
- Flow and Cohesion: Consistency in flooring direction throughout open spaces can promote a sense of flow, connecting different areas seamlessly.
- Focal Point Enhancement: Aligning the flooring direction towards a focal point, such as a fireplace or large window, can draw attention to these features, elevating the room’s aesthetic.
Finally, directing the flooring towards a focal point can emphasize important features in the room. For example, if the flooring leads the eye toward a stunning view or a beautifully designed fireplace, it can enhance the room’s character and make it feel well-designed and intentional.
What Benefits Come from Choosing the Correct Direction for Laminate Flooring?
Choosing the correct direction for laminate flooring installation offers several benefits that enhance both the aesthetics and functionality of a space.
-
Visual Appeal: The direction can significantly impact how a room feels and looks. Flooring installed parallel to the longest wall or natural light source creates an impression of a more spacious area.
-
Natural Light Enhancement: Aligning planks in the direction of incoming light allows for better light reflection, which can brighten the room and highlight the flooring’s texture and color.
-
Easier Installation: Installing along the longest wall or the main entrance simplifies the layout process. This method often results in fewer cuts and waste, saving both time and resources.
-
Structural Considerations: Installing flooring perpendicular to the joists can provide better stability and reduce the risk of sagging or warping over time.
-
Flow and Continuity: Consistency in direction across open spaces enhances the flow from one room to another, making transitions feel natural and seamless.
Selecting the right direction not only improves your flooring’s appearance but also prolongs its lifespan and performance.
How Does Flooring Direction Impact the Perception of Space?
Lastly, considering the room’s specific function is crucial; for example, in a dining room, placing the flooring in alignment with the table can create a more inviting atmosphere.
Can the Direction of Installation Affect the Longevity of Laminate Flooring?
Yes, the direction of installation can affect the longevity of laminate flooring.
Installing laminate flooring in the direction of the primary light source in a room, such as a window, can enhance its appearance and longevity. When the planks are aligned with the light, any seams or imperfections are less noticeable, which can contribute to a more visually appealing floor over time. Additionally, this installation direction often accommodates natural expansion and contraction of the flooring material due to changes in temperature and humidity, which can help prevent warping or buckling.
Moreover, the structural integrity of laminate flooring can be influenced by the installation direction. Installing parallel to the longest wall often provides better support and stability for the flooring, as it allows for a more consistent load distribution. This can lead to reduced wear and tear over time, ultimately extending the life of the flooring. Therefore, considering both aesthetic and practical factors when determining the best direction to install laminate flooring is crucial for maximizing its lifespan.
Related Post: