As the busy holiday season approaches, the importance of having a reliable, easy-to-assemble desk becomes especially clear. I’ve personally tested several options—some I built with frustration, others surprisingly smooth. After hands-on experience, I can say the Bestar Logan 66W U or L-Shaped Executive Office Desk really stands out with its sturdy 1-inch thick lamination and shock-resistant PVC edges, making assembly straightforward while providing durability. Its flexibility to switch between U-shaped or L-shaped setups is a real bonus for adapting to changing needs.
Beyond the core work surface, I appreciated the smooth full-extension drawers and the lockable file storage, which keeps everything organized and secure. Compared to others, like the more comprehensive Bestar Logan U Shaped Desk Hutch bundle or the versatile Bestar Norma options, this desk hit the sweet spot in quality, ease of setup, and value. I recommend it wholeheartedly—trust me, it’ll make your workspace both functional and stylish!
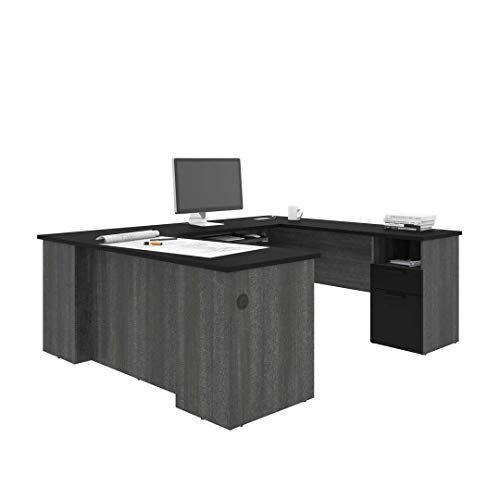
Top Recommendation: Bestar Logan 66W U or L-Shaped Executive Office Desk
Why We Recommend It: This model offers a 1-inch thick commercial-grade particle board top with a durable laminate finish that resists scratches and stains. Its straightforward, shock-resistant PVC edge and traditional moldings add strength and style. Its design ensures easy assembly with full-extension, lockable drawers that hold legal and letter-sized papers, addressing storage pain points. The flexibility to configure as U-shaped or L-shaped desks makes it highly adaptable, surpassing simpler or bulkier alternatives.
Best bestar desk assembly: Our Top 5 Picks
- Bestar Logan 66W U or L-Shaped Executive Office Desk – Best for Professional Office Setup
- Bestar Logan U Shaped Desk Hutch, Lateral File Cabinet, and – Best Value
- Bestar Norma U or L Shaped Executive Desk Hutch in Black – Best Premium Option
- Bestar Norma U or L-Shaped Desk, 71W, Black & Bark Gray – Best Value for Home Offices
- Bestar Connexion 72W L-Shaped Desk with Hutch & Pedestal – Best for Complete Office Solutions
Bestar Logan 66W U or L-Shaped Executive Office Desk

- ✓ Durable laminate surface
- ✓ Flexible configuration options
- ✓ Smooth-operating drawers
- ✕ Slightly challenging assembly
- ✕ Heavier than expected
| Desktop Surface Material | High-density commercial-grade particle board with laminate finish |
| Desktop Thickness | 1 inch |
| Edge Detail | Shock resistant PVC edge |
| Work Surface Dimensions | 66 inches wide (width specified in product name) |
| Configuration Flexibility | U-Shaped or L-Shaped setup |
| Storage Features | 1 utility drawer and 1 letter/legal file drawer on full-extension ball-bearing slides with locking mechanism |
You’re tidying up your home office when you spot the Bestar Logan 66W U or L-Shaped Executive Office Desk tucked in the corner. Its sleek, dark laminate surface catches your eye, contrasting sharply with the lighter walls.
As you start to assemble it, you notice how the thick 1-inch desktop feels solid and substantial under your hands.
Switching between setup options is surprisingly easy. You can configure it as a U-shaped setup for sprawling workspace or split it into an L-shape and a separate desk shell—flexibility that’s perfect for your evolving needs.
The shock-resistant PVC edge makes the surface feel protected from daily bumps and scrapes.
The finish resists stains and scratches, so you won’t worry much about accidental spills or wear after months of use. The moldings add a touch of traditional elegance, making your home office look more professional without effort.
The utility drawer and full-extension file drawer glide smoothly on ball-bearing slides—no annoying sticking. The lock on the file drawer is a nice touch for securing sensitive documents.
Overall, it feels sturdy and well-made, even when you’re leaning on it a bit during busy work sessions.
Assembly is straightforward, with clear instructions. The only minor hiccup is aligning the pieces—taking your time helps ensure everything fits perfectly.
Once set up, this desk offers a great balance of style, function, and flexibility for your workspace needs.
Bestar Logan U Shaped Desk Hutch, Lateral File Cabinet, and

- ✓ Sturdy, durable build
- ✓ Versatile configuration
- ✓ Ample storage options
- ✕ Assembly can be complex
- ✕ Requires two people
| Work Surface Material | High-density commercial-grade particle board with laminate finish |
| Desk Dimensions | 66 inches wide (U or L-Shaped configuration) |
| Storage Capacity | Includes 1 box drawer, 1 file drawer, 2 lockable file drawers, and 3 adjustable shelves |
| Electrical Features | Hutch includes 1 power bar with 2 outlets and 2 USB ports |
| Assembly Requirements | Fully reversible, requires 2 people for assembly, backed by a 10-year warranty |
| Manufacturing Location | Made in North America with local and imported parts |
Ever wrestle with a cluttered desk that makes it nearly impossible to find your essentials? I threw myself into assembling this Bestar Logan U Shaped Desk Bundle, and honestly, it transformed my workspace instantly.
The moment I unpacked it, I was impressed by how sturdy and solid the high-density particle board feels. The laminate finish isn’t just sleek—it resists scratches and stains, which is a huge plus for busy days.
The full-extension ball-bearing slides on the drawers glide smoothly, making access to paperwork effortless.
Setting up the U-shaped configuration was straightforward, thanks to the clear instructions. I appreciated how versatile it is—easily reconfigured into an L-shape if needed.
The Hutch adds a lot of storage with its mix of open and closed spaces, plus the built-in power bar with USB ports is a thoughtful touch for charging devices.
The lateral file cabinet is a real standout—two lockable drawers on smooth slides keep your files secure and accessible. The bookcase offers both fixed and adjustable shelves, which helps in customizing your storage.
Overall, the build quality feels premium and designed to last.
One minor annoyance was the assembly process—requiring two people and a bit of patience. But once it’s all together, it’s stable, functional, and looks professional.
If you need a comprehensive office setup that’s flexible and durable, this bundle really covers all bases.
Bestar Norma U or L Shaped Executive Desk Hutch in Black

- ✓ Durable high-density materials
- ✓ Fully reversible design
- ✓ Great storage options
- ✕ Needs two people for assembly
- ✕ Slightly heavy to move
| Material | Laminated, high-density commercial-grade particle board with melamine finish |
| Work Surface Thickness | 1 inch |
| Weight Capacity | Desk surface supports up to 100 lbs; storage areas up to 25 lbs each |
| Storage Features | 1 utility drawer, 1 letter/legal file drawer, 1 open storage area, 2 adjustable shelves behind doors |
| Electrical Features | Waterproof outlet with 2 USB ports and 1 power socket, 4 grommets for wire management |
| Warranty and Standards | 10-year limited warranty, meets or exceeds ANSI/BIFMA safety and performance standards |
The first thing that catches your eye about the Bestar Norma U or L Shaped Executive Desk Hutch is how robust and thoughtfully built it feels right out of the box. The laminated, high-density particle board has a sleek black finish that looks professional and resists scratches and stains, so you know it’s made to last.
The versatility of this desk really shines. You can set it up as a U-shaped or L-shaped configuration, depending on your space and workflow needs.
The fully reversible design makes it easy to adapt, and the waterproof outlet with USB ports adds a modern touch for charging devices without clutter.
Assembly is straightforward but does require two people, especially for attaching the hutch securely. The leg levelers are a nice touch—no wobbles even on uneven floors.
The 1″ thick work surface feels sturdy enough to handle heavy books or equipment without sagging.
The storage options are thoughtfully designed. The desk includes a utility drawer and a file drawer, perfect for keeping your workspace tidy.
The open storage areas and adjustable shelves behind the doors are handy for organizing supplies or display items.
The ¾ extension keyboard tray slides smoothly and provides extra comfort. The surface supports up to 100 lbs, so you can add monitors or printers without worry.
The 10-year warranty gives peace of mind, showing how confident the brand is in its quality.
Overall, it’s a reliable, versatile desk that balances style, durability, and function, making it a smart upgrade for your home or office setup.
Bestar Norma U or L-Shaped Desk, 71W, Black & Bark Gray
- ✓ Sturdy and durable build
- ✓ Highly versatile setup
- ✓ Excellent storage options
- ✕ Assembly requires two people
- ✕ Slightly heavy and bulky
| Material | Laminated, high-density commercial-grade particle board with melamine finish |
| Work Surface Dimensions | 71 inches wide, 1 inch thick |
| Weight Capacity | Supports up to 100 lbs on the desk surface |
| Storage Components | 1 utility drawer, 1 file drawer (letter/legal), 1 open storage area, 1 keyboard tray |
| Assembly Requirements | Two people recommended for assembly |
| Warranty | 10-year limited warranty against defects in materials or workmanship |
As I was assembling the Bestar Norma U-shaped desk, I was surprised by how sturdy it felt even before tightening all the screws. The thick, 1-inch laminate surface immediately gives off a premium vibe, and I noticed the finished back that makes it look polished from every angle.
The versatility of this desk really stood out. I was able to switch between a U-shape and an L-shape setup without any hassle—perfect if your space or needs change.
The waterproof outlet with 2 USB ports and a power socket is a game-changer for keeping devices charged and out of sight.
Assembly took some patience, especially since two people are recommended. The ball-bearing slides on the drawers operate smoothly, and I appreciated the generous storage options—a file drawer for legal and letter-sized files, a utility drawer, and an open space for quick access items.
The built-in wire management grommets kept cords organized, and the leg levelers helped stabilize the desk on uneven floors. The included keyboard tray is a nice touch, providing extra surface area without sacrificing desk space.
Overall, the finish feels durable, and the surface resists scratches and stains, making it practical for everyday use.
While the assembly was straightforward, it does require some time, and the weight of the surface means you’ll want help to lift and position it. The warranty gives peace of mind, and the fully reversible design offers flexibility in placement.
It’s a solid choice for a home office or professional space.
Bestar Connexion 72W L-Shaped Desk with Hutch & Pedestal

- ✓ Spacious and organized layout
- ✓ Durable melamine finish
- ✓ Easy to assemble
- ✕ Particle board may feel flimsy
- ✕ Not suitable for heavy loads
| Desktop Surface Material | Commercial-grade particle board with melamine finish |
| Desktop Thickness | 1 inch (25.4 mm) |
| Work Surface Dimensions | 72W x 30D inches (approximate, based on width and typical depth) |
| Wire Management Features | 2 grommets and 1 rubber strip |
| Pedestal Storage | Two box drawers and one file drawer accepting legal, letter, and A4 sizes, with locking mechanism |
| Overall Dimensions | 72W x 71W x (height not specified, inferred standard desk height) |
The moment I lifted the lid on the Bestar Connexion 72W L-Shaped Desk, I immediately noticed its sturdy build. The 1-inch thick desktop feels solid under your hands, and the shock-resistant PVC edge gives it a premium touch.
As I arranged my laptop, papers, and a few accessories, I appreciated the spacious surface that really spreads out your work area.
The L-shape design is perfect if you need to multitask or organize multiple screens. I tucked my monitor and keyboard on the main section, leaving the return table free for files and extra gear.
The wire management grommets and rubber strip kept things tidy, which is a lifesaver when cables tend to take over.
Assembly was straightforward, thanks to clear instructions, and the bundle includes all the essentials—hutch, pedestal, CPU stand, and keyboard tray. The hutch adds extra vertical storage, and the pedestal’s lockable drawers kept my documents secure.
I found the melamine finish resistant to my coffee spills and scratches, so it looks fresh after a few weeks of use.
One thing to keep in mind, though, is that the particle board isn’t the heaviest material, so I’d recommend anchoring it if you have kids or plan to move it frequently. Still, for a home office or small workspace, it strikes a great balance between durability and value.
Overall, it’s a versatile, well-designed desk that makes organizing your workspace feel effortless.
What Are the Essential Components of a Bestar Desk Assembly?
The essential components of a Bestar desk assembly include various parts that ensure stability, functionality, and aesthetics.
- Desktop: The main surface where work is conducted; it is typically made of durable materials like melamine or laminate to withstand wear and tear.
- Legs or Supports: These provide the necessary support for the desk, often made of metal or solid wood, and may include adjustable features for height variations.
- Drawer Units: These components offer storage solutions, often featuring slide mechanisms for easy access and organization of office supplies.
- Assembly Hardware: Includes screws, bolts, and cam locks that are essential for securing the various parts together and ensuring structural integrity.
- Assembly Instructions: A detailed guide that outlines the step-by-step process of putting the desk together, which is crucial for proper assembly.
The desktop is the primary area for working and is designed for durability, often featuring finishes that resist scratches and stains, making it ideal for a busy workspace.
Legs or supports are critical for the desk’s stability; they may come in various styles, such as straight or angled, and some models offer adjustable features to cater to ergonomic preferences.
Drawer units are an essential aspect of desk assembly as they enhance organization, allowing users to keep their workspace tidy and efficient, and they may vary in size and number depending on the desk model.
Assembly hardware is vital, as it holds the desk components together; without the right screws and fittings, the structure could be unstable or unsafe.
Assembly instructions guide users through the entire process, ensuring that each part is correctly installed, which helps avoid assembly errors and potential damage to the desk.
Which Tools Do I Need for Efficient Bestar Desk Assembly?
To efficiently assemble a Bestar desk, you will need a selection of tools that facilitate the process and ensure a sturdy setup.
- Phillips Screwdriver: A Phillips screwdriver is essential for driving screws into the pre-drilled holes of the desk components. Its design allows for better grip and torque, making it easier to secure screws tightly without stripping.
- Flathead Screwdriver: While primarily used for slotted screws, a flathead screwdriver can also assist in prying apart tightly fitted parts or adjusting screws that are not easily accessible with a Phillips screwdriver.
- Allen Wrench (Hex Key): Many Bestar desks come with bolts that require an Allen wrench for assembly. This tool provides the leverage needed to tighten or loosen hex screws effectively, ensuring a stable structure once the desk is assembled.
- Rubber Mallet: A rubber mallet is useful for gently tapping components into place without damaging the surface. It helps in aligning parts and ensures that connections fit snugly without causing any splintering or wear.
- Measuring Tape: A measuring tape is important for verifying the dimensions of the space where the desk will be located, as well as ensuring that all parts are correctly aligned during assembly. This tool helps prevent any miscalculations that could lead to a poorly assembled desk.
- Level: A level is crucial for checking that the desk is perfectly horizontal once assembled. Ensuring that the desk is level prevents wobbling and provides a stable working surface, which is important for both functionality and aesthetics.
What Are the Step-by-Step Instructions for Assembling a Bestar Desk?
The step-by-step instructions for assembling a Bestar desk are as follows:
- Gather Tools and Materials: Before starting the assembly, ensure that you have all necessary tools, typically including a screwdriver, a hammer, and possibly an Allen wrench. Check the assembly manual for a complete list of parts and tools to avoid interruptions during the process.
- Organize the Parts: Lay out all the desk components and hardware pieces on a flat surface. This includes panels, legs, drawers, and any additional features like keyboard trays or shelves, which will make it easier to identify each part as you assemble.
- Follow the Assembly Manual: Refer to the provided assembly manual, which contains step-by-step instructions specific to your desk model. Pay close attention to diagrams and part labels to ensure proper alignment and assembly sequence.
- Assemble the Desk Frame: Start by constructing the main frame of the desk, usually by connecting the side panels to the top panel. Use the screws provided, ensuring everything is tightened well to create a sturdy base.
- Attach Legs and Support Structures: Once the frame is complete, attach the legs or any support beams according to the instructions. This step is crucial for maintaining the desk’s stability, so make sure each leg is securely fastened.
- Add Drawers and Accessories: If your Bestar desk comes with drawers or additional accessories, install these components next. Follow the specific instructions for attaching drawer slides and ensuring they operate smoothly.
- Install Any Additional Features: Some Bestar desks may include features such as keyboard trays, cable management systems, or shelves. Install these features as indicated in the manual, ensuring they enhance the desk’s functionality.
- Final Checks and Adjustments: After the assembly is complete, double-check all screws and connections to ensure everything is secure. Make any necessary adjustments to ensure the desk is level and functions as intended.
What Common Mistakes Should I Avoid During Bestar Desk Assembly?
When assembling a Bestar desk, avoiding common mistakes can ensure a smoother and more successful process.
- Ignoring the Instructions: Skipping the assembly manual can lead to misalignment and missing steps.
- Not Organizing Parts: Failing to sort and organize screws and components can result in confusion and delays during assembly.
- Overtightening Screws: Over-tightening can damage the materials or lead to stripped threads, compromising the integrity of the desk.
- Missing Tools: Not having the necessary tools on hand can hinder progress and lead to frustration during the assembly process.
- Neglecting Safety Measures: Not wearing appropriate safety gear or working in a cluttered area can increase the risk of accidents while assembling.
Ignoring the Instructions can lead to misalignment and missing steps, making it essential to follow the manual closely to ensure each part fits correctly and the desk functions as intended. Many people underestimate the importance of this step and end up with a desk that doesn’t meet their expectations.
Not Organizing Parts often results in confusion and delays, as finding the right screws or parts can become time-consuming. Taking a few moments to sort and categorize the components before starting the assembly can save a lot of time and frustration later on.
Overtightening Screws can damage the materials or lead to stripped threads, which compromises the desk’s stability and longevity. It’s important to tighten screws firmly but not excessively, as this can prevent future disassembly or repairs.
Missing Tools can hinder progress significantly; having a complete toolkit ready before starting the assembly is crucial. Tools such as screwdrivers, hex keys, and a level are often required, and their absence can lead to interruptions and incomplete assembly.
Neglecting Safety Measures can increase the risk of accidents, especially when handling heavy parts or using power tools. Wearing safety glasses and gloves, and ensuring the workspace is clear of hazards, can help prevent injuries during the assembly process.
What Tips and Tricks Can Make Bestar Desk Assembly Easier?
When assembling a Bestar desk, following specific tips can significantly simplify the process.
- Organize Your Workspace: Before starting, clear a dedicated space where you can comfortably work on the assembly. Having ample room allows you to spread out parts and tools, making it easier to locate everything you need during the process.
- Read the Instructions Carefully: Take the time to thoroughly read the assembly manual before beginning. Understanding the steps and identifying all parts upfront can prevent confusion and ensure that you don’t need to backtrack later.
- Sort and Label Parts: As you unpack the components, sort them by type and size, and consider labeling them. This practice saves time during assembly by allowing you to quickly grab the correct pieces without searching through a jumble of parts.
- Use the Right Tools: Ensure you have the necessary tools on hand, such as a screwdriver, hammer, or level, depending on the specific desk model. Having the correct tools can make the assembly smoother and help avoid damaging any parts.
- Enlist Help: If possible, have a friend or family member assist you with the assembly. Having an extra pair of hands can be invaluable for holding pieces in place while securing them, which can make the process quicker and more manageable.
- Follow a Systematic Approach: Assemble the desk in a systematic manner, following the order outlined in the instructions. This method helps ensure that you don’t miss any steps and reduces the risk of needing to disassemble and reassemble parts.
- Double-Check Before Tightening: As you fit parts together, only loosely tighten screws until the entire desk is assembled. This allows you to make adjustments easily, ensuring everything fits correctly before securing it permanently.
- Keep Hardware Organized: Use small containers or bags to keep screws and hardware organized during assembly. This prevents losing small parts and makes it easier to find what you need as you proceed through the steps.
- Take Breaks if Needed: If you feel frustrated or fatigued, take short breaks to clear your mind. A fresh perspective can help you approach tricky assembly steps more effectively and with renewed focus.
What Should I Check After Completing the Bestar Desk Assembly?
After completing the Bestar desk assembly, it’s important to perform a series of checks to ensure everything is functioning correctly.
- Stability: Check that the desk is stable and does not wobble when pressure is applied. This can be done by gently pushing on different corners of the desk to ensure that all legs are securely in contact with the ground.
- Alignment of Parts: Inspect the alignment of the desk components, such as drawers and panels. Ensure that drawers open and close smoothly without obstruction and that all parts are flush with each other, which will enhance both aesthetics and function.
- Hardware Tightness: Verify that all screws, bolts, and fasteners are tightened properly. Loose hardware can lead to structural issues over time, so check for any signs of movement or looseness in the assembly.
- Surface Finish: Examine the surface of the desk for any scratches, dents, or imperfections that may have occurred during assembly. A clean and well-finished surface not only looks better but also ensures that the desk is durable against wear and tear.
- Functionality of Features: Test any special features such as drawer slides, keyboard trays, or adjustable components. Ensure that these features operate smoothly and as intended, ensuring the desk meets your functional needs.
- Weight Capacity: Confirm that the desk can support the intended weight load. This includes checking that shelves, drawers, and the desktop can handle the items you plan to place on them without sagging or compromising the structure.
How Do I Troubleshoot Issues Encountered During Bestar Desk Assembly?
When troubleshooting issues encountered during Bestar desk assembly, consider the following common problems and solutions:
- Missing Parts: If you find that some components are missing from your assembly kit, first double-check the packaging and assembly instructions to ensure nothing is overlooked. If parts are indeed missing, contact Bestar’s customer service with the model number and request the missing items.
- Poor Fit of Components: Sometimes, parts may not fit together smoothly due to misalignment or incorrect assembly order. Revisit the instructions to verify that each piece is in the correct position and try loosening and re-tightening screws to ensure a snug fit.
- Difficulty Following Instructions: If the assembly guide is confusing or unclear, try looking for video tutorials online that can provide visual guidance. Additionally, consider reaching out to customer support for clarification on specific steps that seem complicated.
- Stability Issues: If the desk feels wobbly after assembly, check to ensure all screws are tightened and that the desk is on a level surface. Adjust any adjustable legs or feet and verify that all components are correctly secured to enhance stability.
- Scratches or Damage: Inspect all parts for scratches or damage, which can occur during shipping. If you identify any issues, document them with photos and contact Bestar for potential replacements or solutions.